
Scenes from the battle
The Battle of Dunbar was brutal and over within an hour, Cromwell’s superior troops and tactics winning the day.
No detailed Scottish accounts of the battle survive but there is a pictorial plan drawn up by Fitz-Payne Fisher in about 1652, which is itself based on eye-witness accounts. During the 20th century, the site of the battle was bisected by the A1 road upgrade and has been partially quarried away. Nevertheless, the plan shows many familiar topographical features such as the coastline, the Broxburn (the stream) and the higher ground of Doon Hill where the Scots were camped as well as known buildings such as the church in Dunbar. Cromwell’s tented camp is shown to the north of the Broxburn (right on the map) while the battle is underway to the south (left here). Rather confusingly to our eyes, several key engagements are shown as occurring at the same time, including the Scots cavalry riding away at the top of the map. In spite of this, a huge amount of detail can be deciphered including details of tactics and the composition of the two armies. Artillery, for example, was of little use in an encounter of this kind because cannons were cumbersome to manoeuvre around quickly.
 The Battle of Dunbar 1650 as drawn by Fitz-Payne Fisher. WA.Suth.C.3.293.1 ‘The Victory at Dunbar’, published by Peter Stent, about 1650. Image © Ashmolean Museum, University of Oxford.
In this part of Fisher’s plan (see below), the English and Scots cavalry square up to each other and the English trot forward knee-to-knee in attack, breaking forward with their broadswords and pistols with the aim of pushing the Scots backwards uphill. Casualties, both men and horses, litter the battlefield. Although cavalry charges could inflict serious injury with heavy animals moving at speed, one longer term medical complication was the introduction of splintered bone, scraps of cloth and field dirt into wounds. This led to infection and ultimately gangrene. Head wounds, unless superficial, were invariably fatal.
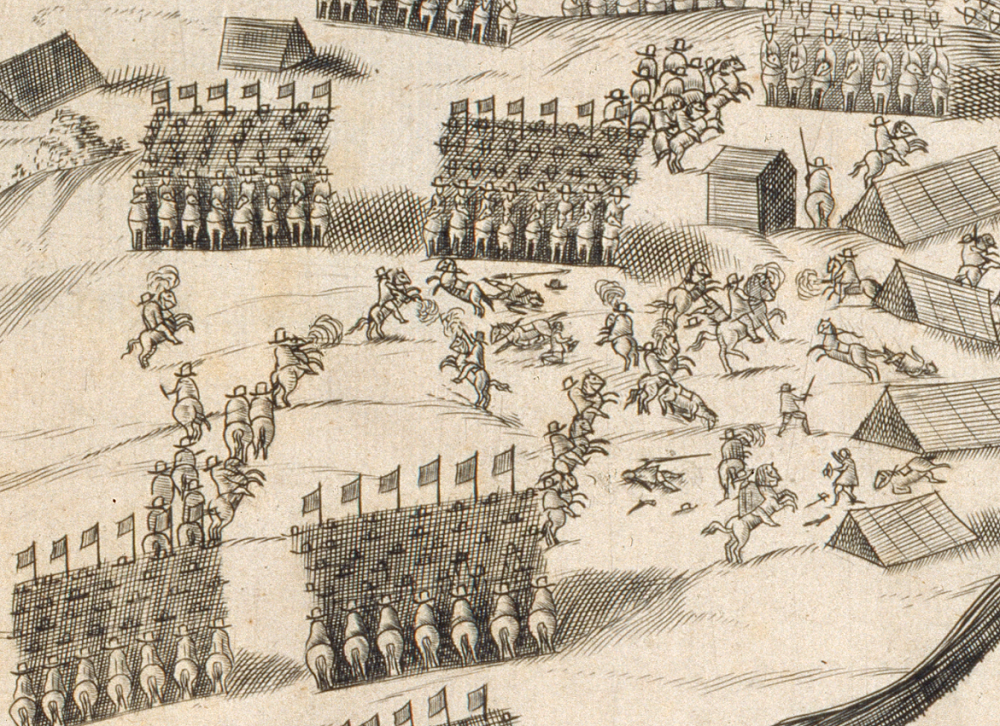 Detail of The Battle of Dunbar 1650 as drawn by Fitz-Payne Fisher. WA.Suth.C.3.293.1 ‘The Victory at Dunbar’, published by Peter Stent, about 1650. Image © Ashmolean Museum, University of Oxford.
Part of Fisher’s plan (see below) depicts the Scots baggage train. Drawn tightly together, the wagons are secured by infantry stationed around the perimeter. The wagons would have carried the equipment necessary to support the troops such as water and other supplies such as gunpowder. Anecdotes abounded at the time of fatal explosions following the careless lighting of tobacco pipes in the vicinity of gunpowder stores and ammunition wagons. The baggage train was usually placed behind the army, just as it is shown here. In a letter to the Speaker of the House of Commons on the day after the battle, Cromwell states that ‘the whole [Scottish] baggage and train’ was taken.
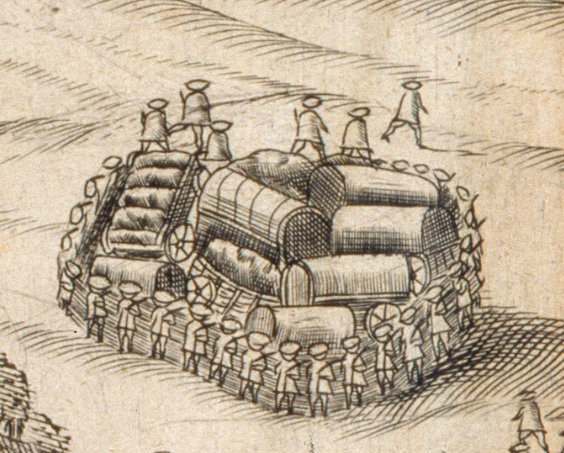 Detail of The Battle of Dunbar 1650 as drawn by Fitz-Payne Fisher. WA.Suth.C.3.293.1 ‘The Victory at Dunbar’, published by Peter Stent, about 1650. Image © Ashmolean Museum, University of Oxford.
This final scene shows opposing infantry and pikemen; the two sides can be distinguished by their headwear (the Scots distinctive in their bonnets). In each regiment about one third of the soldiers are pikemen carrying 16ft (5m) wooden shafts with steel points, the rest being musketeers armed with matchlock and flintlock muskets which used gunpowder and lead bullets. There were no bayonets at this period. The action proceeded by musketeers firing rank by rank in a steady volley of fire. The pikemen then pressed forward to push the enemy backwards and could inflict deep wounds and slashing cuts with their weapons.
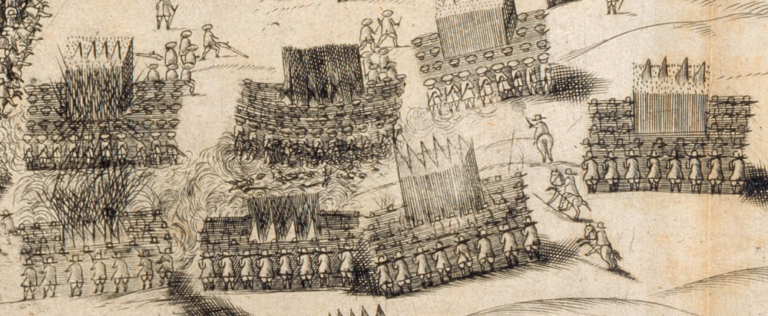 Detail of The Battle of Dunbar 1650 as drawn by Fitz-Payne Fisher. WA.Suth.C.3.293.1 ‘The Victory at Dunbar’, published by Peter Stent, about 1650. Image © Ashmolean Museum, University of Oxford.
Archaeology and the Battle of Dunbar 1650: From the Scottish Battlefield to the New World


Archaeology and the Battle of Dunbar 1650: From the Scottish Battlefield to the New World
Reach your personal and professional goals
Unlock access to hundreds of expert online courses and degrees from top universities and educators to gain accredited qualifications and professional CV-building certificates.
Join over 18 million learners to launch, switch or build upon your career, all at your own pace, across a wide range of topic areas.


