
Bacterial contamination: do-it-yourself water testing
Bacterial contamination of water can come from many different sources; waste or faecal matter are two possible sources, as are insects that land in stagnant water. But how do you know if water is safe to drink? Here’s an experiment you can do at home to test water safety.
There are two easy tests that can be done at home to see if it is drinkable.
Firstly, you can test for pH, which shows how acidic (low pH) or alkaline (high pH) a liquid is. Drinking water typically has a neutral pH (pH7) which can change slightly depending on the area in which you live. Changes in water pH can be an indicator of contamination of the water supply. Certain bacteria will make water more acidic as they grow in them, but pH is also a good indicator of contamination from other sources, particularly chemicals which shouldn’t be there.
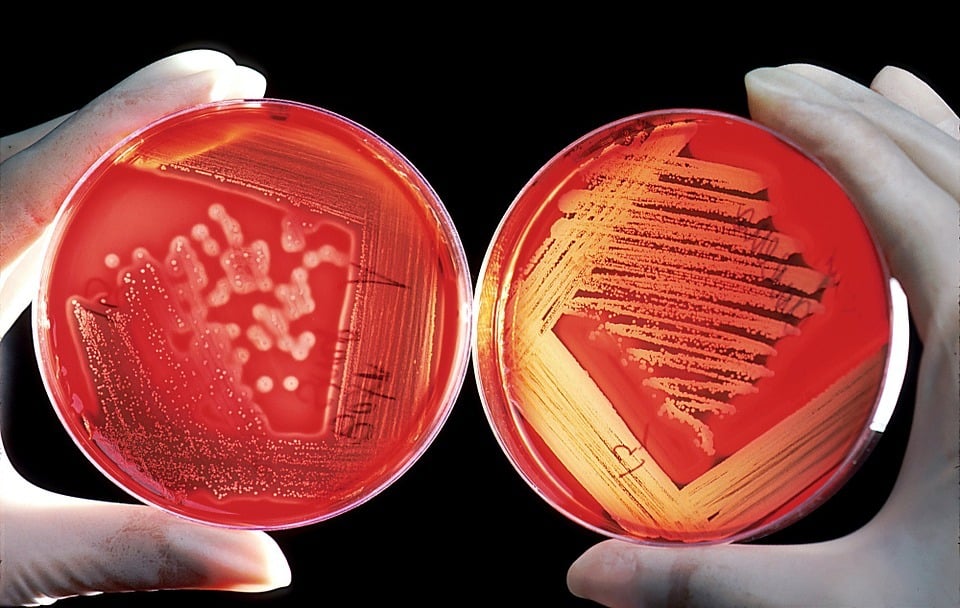
The second test for bacterial contamination is done by growing bacteria on an agar plates, a technique done in most biological labs, hospitals or water treatment companies. Agar is a type of jelly containing the relevant nutrients and sugars for bacteria to grow on. Samples of the water are usually taken, and these are then swabbed onto prepared agar plates in sterile conditions, avoiding contamination. The bacteria then grow into large colonies on this over two to three days.
Part 1: Synthesising Your own pH indicator
What you need:
- 1 small red cabbage
- Knife/scissors or blender
- Water
- Saucepan
- Sieve or coffee filter
- Vinegar or lemon juice
- Bicarbonate of soda or antacid tablets
- Some clear containers
- Some water samples to test
Note: Please be careful when using knives and scissors, and sources of heat.
How to:
-
Chop/cut/blend half of the red cabbage into small pieces (roughly 1 cm2).

-
Place the red cabbage in the saucepan and cover in water (approx. 1 litre) and bring to the boil. Boil the cabbage until the water has turned a purple colour, which takes about 10 minutes.

-
Let the water cool and filter off the cabbage using a sieve or coffee filter. The liquid should be a purple/red colour and is approximately pH7 or neutral.

Testing:
- Take some clear containers – anything that can hold water and be seen through (clear plastic cups are ideal)
- Get a water sample from the tap (20 – 50 ml is ideal) and add to this a tablespoon of vinegar, which will form our acid.
- Get a water sample from the tap (20 – 50 ml) and add to this a tablespoon of bicarbonate of soda or antacid tablet and allow it to dissolve. This will should turn the water alkaline.
- Get a water sample from the tap (20 – 50 ml) to be our test sample.
- To each container add 20-50ml of the cabbage juice.
- If the pH of the liquid is acidic the cabbage juice will start to turn the liquid a red or pink colour. If the pH is more alkaline the cabbage juice will turn a greenish colour. Neutral pHs will stay purple.

Added extras:
If you are interested, try other household liquids that you may have and repeat the above, adding an equal volume of cabbage juice to each to work out their pH by comparing to the below scale. You could also carefully take water samples from puddles, ponds or other nearby water sources.
Part 2: Making your own agar plates
What you need:
- Beef or chicken stock cubes
- Sugar
- Gelatin sheets
- Water
- Saucepan
- Clear containers
- Cotton swabs (optional)
- Candle
How to:
- Bring 500 ml of water to the boil in the saucepan.

- Add 1 stock cube and 1 tablespoon of sugar to the water, and stir until dissolved.
- Add two Gelatin sheets to the water and allow to dissolve.

- Allow the agar mixture to cool slightly, before pouring this into the clear containers (plastic cups make excellent containers) and cover these to prevent them becoming contaminated. Only take the lids off the containers when they are ready to use.

- Immediately put these in the fridge for a few hours until the gelatin has set. Do NOT touch the agar, as you will contaminate it.

- Collect some water samples in some other containers, from the tap, puddle, or any other water sources.
- When you’re ready to use the petri dishes get these out of the fridge and place them next to the lit candle (Note: please take care when lighting and using the candle not to burn yourself and keep away from things that could burn). The candle prevents the agar plates being contaminated with any bacteria from the air.
- Get a cotton swab or a piece of absorbent paper and dip this in the water to be sampled. Rub the swab over the surface of the agar gently in a zig-zag pattern and put the lid back on the container.
- Repeat step 8 for all of your samples.
-
Leave the petri dishes in a warm place for 2-5 days. Over the next few days you’ll start to see colonies of bacteria appear on the surface of the agar, if any were present in the water sample. Note: Please Do NOT leave the petri dishes in the kitchen or near any surfaces you prepare food on, so as not to contaminate your food with any bacteria.

- Dispose of the containers by placing the containers in the bin, taking care not to touch the agar, and washing your hands and any surfaces the agar plates were on with antibacterial soap.
Added extras
Why not try seeing if the growing bacteria change the pH of their surroundings as they grow? Instead of using water to make your agar jelly take some of the red cabbage juice that we made earlier as a pH indicator and add the stock cube sugar and gelatin to this to try and make some pH sensitive agar plates.
Over to you
Post some pictures of your DIY water testing experiment on our padlet and make a note there on any surprising results.
In the Comment section below, feel free to discuss your findings with your fellow learners. Also, do you have any other ideas how people around the world might be able to test water quality, relatively cheaply?
Engineering the Future: Creating the Amazing


Engineering the Future: Creating the Amazing
Reach your personal and professional goals
Unlock access to hundreds of expert online courses and degrees from top universities and educators to gain accredited qualifications and professional CV-building certificates.
Join over 18 million learners to launch, switch or build upon your career, all at your own pace, across a wide range of topic areas.


