How to separate complex biological samples

Share this step
The object of this exercise is to enable you to think about how complex biological samples are. A drop of blood or saliva may not look like much to us, but at a chemical level, both liquids are incredibly complex.
Blood by itself contains red and white blood cells, platelets, as well as plasma which itself contains proteins, hormones, glucose and salts as well as dissolved gasses which can be used as biomarkers to identify diseases.
When looking for biomarkers in biological samples it is often necessary to split complex materials like these into their component parts. By splitting these samples into their individual components, we avoid interference from other parts of the sample, a process known as biofouling. It is often necessary to filter the samples to remove any unwanted materials and neutralize the sample before analysis, so that the sample is at the most suitable pH for our test.
These processes are key to biomedical engineering. Much of the research conducted here in the bio-inspired technologies team focuses on overcoming these problems, designing devices that can take biomedical processes often conducted in a large laboratory on multiple bits of equipment, and engineer these into much smaller devices. A process called miniaturisation is the key to creating microfluidic or lab-on-a-chip devices for use in point of care diagnostics for medical testing. A good example of this is the pregnancy test which is deconstructed in a later step. In a pregnancy test, biomarkers are required to be separated from the biological sample, by a set of filters embedded within the paper structure, while also chemically filtering these to neutralise the sample’s pH, and then perform the test.
Engineering is a subject on the boundaries of science and often overlaps with these, and we often have to understand the chemical or biological processes which we are trying to engineer into a device as well as the engineering principles underpinning these.
Experiment
The experiment below can be done in your own kitchen. It walks you through the process of splitting a complex biological fluid (milk) into its component parts. Milk is one of the most challenging biological fluids to perform biotesting upon, because it contains lots of fats, sugars and proteins that can easily interfere with testing, and its makeup differs greatly from animal to animal. After splitting this, down feel free to post in the Comments how you feel you could construct a device that would be able to perform these chemical process.
Safety Note: Please be extremely careful when using and handling hot liquids and stoves to perform the experiment
You will need:
-
Milk (whole or semi skimmed, 250ml)
-
Vinegar or lemon juice
-
Calcium Carbonate (bicarbonate of soda)
-
Alcohol (concentration of 30% – vodka or gin are ideal, medical alcohol will also work)
-
Coffee filters (or a piece of kitchen roll)
-
Funnel
-
Saucepan
-
Spoon
-
Containers for the different components (bowls are ideal)
-
Stove or hotplate
-
Thermometer (optional)
Separating off the fat
Firstly, we will separate the fat content from the milk. This works best with whole milk but can be attempted with semi-skimmed. Fats are complex molecules composed of lipids and fatty acids, which can help to mask smaller molecules in a biological sample and can easily stick to and ‘foul’ surfaces like electrodes, which can be used to analyse biomarkers.
-
Pour 250 ml of milk into a measuring jug on a scale and note this down.
-
Boil the milk in a saucepan for five minutes.
-
Remove from the heat and let the milk settle for a few minutes.
-
The fat will form a layer on the surface. Carefully scoop this off into a bowl and measure the mass of fat that is collected.
-
You can then work out approximately how much fat is in the milk by percentage.
Separating the protein
The proteins in milk are the most common components for testing, as they contain a variety of biomarkers, typically antibodies (a key marker of disease if present in high levels).
-
Take the milk that has had the fat removed and heat it again (approx. 40°C).
-
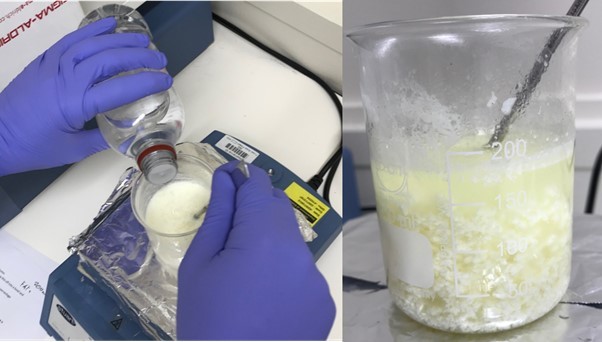
Add some vinegar or lemon juice to this, one drop at a time, while stirring the milk. A white precipitate will start to form as the milk curdles and coagulates. This contains the protein casein.

-
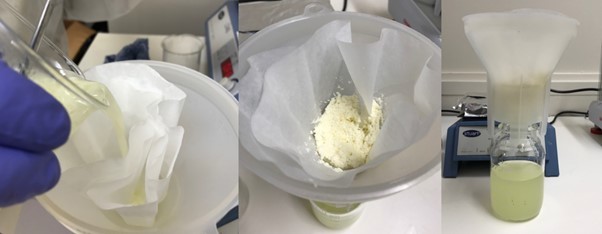
Take a coffee filter, fold it into quarters, and place this into a funnel, and filter the milk through this into the beaker.
-
Keep the liquid in the beaker, as we’ll use this to isolate the sugar (lactose) later.

-
Let the protein you collected in the filter paper dry. You can weigh this to work out the percentage of protein in the milk.
Separating the sugar
-
Take the liquid portion that we filtered off from the solid protein previously, and heat this up while adding a teaspoon of sodium bicarbonate. Be careful as this will foam due to the bicarbonate reacting with the acid.
-
Heat the liquid for a few minutes with constant stirring.
-
Filter the liquid again to remove any further protein precipitate.
-
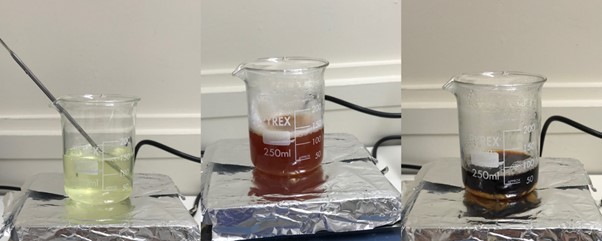
Boil the filtered liquid until you get a syrup (approx. 60ml). (Don’t be worried if you observe a colour change to dark brown at this point as the sugars can caramelise easily).

-
Let this cool slightly and add 100 ml of alcohol. This can be anything stronger than 35% and a clear liquid works best (e.g. vodka) or even better, medical alcohol. Don’t worry if you don’t have this, just skip to the next step, and stir well.
-
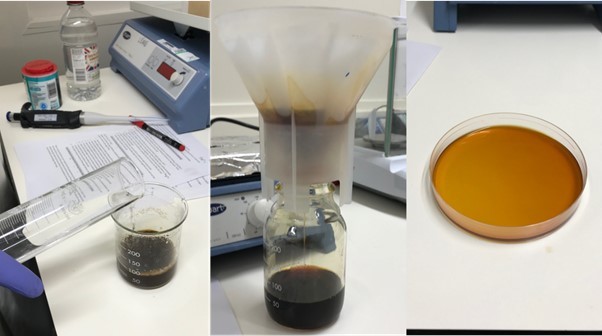
Filter off the liquid again from any further precipitate.

-
Let the liquid evaporate in the bottom of a container. What you should be left with is a film of white crystals over the bottom of the dish.
-
The crystals mainly consist of the sugar lactose, which is what makes milk taste sweet.
Over to you
Post a picture of your experiment and your results on the padlet. Discuss your results from the experiment using the comments below. Did anything surprise you? Feel free to suggest ideas in which you think this can be turned into a fully engineered or automated format.
Share this
Engineering the Future: Creating the Amazing

Engineering the Future: Creating the Amazing


Reach your personal and professional goals
Unlock access to hundreds of expert online courses and degrees from top universities and educators to gain accredited qualifications and professional CV-building certificates.
Join over 18 million learners to launch, switch or build upon your career, all at your own pace, across a wide range of topic areas.
Register to receive updates
-
Create an account to receive our newsletter, course recommendations and promotions.
Register for free


