Social media tips and tools
FutureLearn is a social learning environment at its heart. To get the most out of it we recommend that you fill out your learner profile and add a photo so that other learners can get to know you a bit better. And did you know you can ‘follow’ other learners that you find interesting so you can find their comments more easily?
There are also lots of other great social media services on the web that some educators might recommend you use to get more out of your course. Here are some tips and guides to help you get started.
Blogging tools
Some educators may suggest that you use a blog to capture your thoughts as your course progresses to develop your skills as a reflective learner. This is entirely optional but it can be a fun and rewarding way to enhance your learning experience.
If you don’t already have a favourite blogging tool, we recommend Tumblr. Tumblr is free and very straightforward to use, and also contains some useful social features.
Tumblr allows you to tag your posts, so if you tag your posts with your course hashtag, other learners on the course can find them easily.

If Tumblr doesn’t take your fancy, WordPress is another popular free tool. Or if you have a Google account you could sign straight in to Blogger to create a blog there.
Sharing your blog posts with other learners on FutureLearn
If you’ve written or posted an image of something on your blog that you’d like to share with other learners, you can share the URL for that specific blog post by posting it in the comments, which will automatically turn it into a link. This can be useful if you’ve written something longer and more-in depth than would be appropriate for a regular comment, or if you’re given a special assignment by your educator.
To find the URL of a post you have written…
Tumblr: from your Dashboard, go to ‘posts’ in the right-hand menu and then click on the top-right corner of the post you wish to link to. Once the post has loaded, copy the URL from your address bar.
WordPress and Blogger: this will vary depending on your theme, but generally you can click on the title or date of a post from your blog’s homepage to go to that individual blog post. Then copy the URL from your address bar.
Temporary text hosting
If you have been asked to share a longer piece of text (more than 1200 characters) with other learners, you could publish this to your own blog if you have one. But if for any reason that doesn’t suit you, you could choose to publish it on a free tool that simply hosts anonymous pages of text, no registration required.
With this, you can copy your whole text from the place you have written it and paste it into the form. You then ‘create’ or ‘publish’ the form which generates a very basic web page with its own unique address (URL), which you can share wherever you choose. Get the URL by copying it from your browser’s address bar.
Sharing images with other learners on FutureLearn
Some educators may ask you to create images and then share them with other learners on FutureLearn.
To do this, first upload the file to an image-hosting service, and then paste the URL of your image (you can copy this from your browser’s address bar while viewing the image) into a comment, reply or assignment on FutureLearn. It will be automatically turned into a link and highlighted in pink.
We normally recommend that learners set up a free Flickr account, but you are welcome to use other services if you would prefer.
Alternative free services include:
Google Photos (see instructions for image sharing)
Dropbox (see this guide to image sharing)
Pinterest (you can upload your images as ‘pins’)
Photobucket
Image Shack
500px (for photo-sharing only, not other types of image)
You could also use Tumblr, Twitter or Facebook (making sure your post is set to public) provided you don’t mind your existing followers seeing what you’re posting. Don’t forget to include the #hashtag for your course so that other learners can easily find it.
Where you are taking photographs of people, we ask you to get consent from the subject to upload their image and explain how the image will be used. You must agree that you own the rights to the images.
If you’re using an existing account, you may wish to check your privacy settings to see what personal information you may be sharing.
Signing in to Flickr
To use Flickr to store and share your images, you will first need to sign in.
You can sign straight in to Flickr if you already have a Yahoo! account (e.g. if you use Yahoo! mail). If you don’t have an account you will need to create one.
Once logged in, Flickr will take you through your initial steps of choosing a screen name (which can be the same as your login user name or can be different). You will then be able to choose an avatar and edit your profile.
TIP: You can edit your profile any time you are logged in to Flickr, by clicking on your username in the top right corner of the page, and choosing ‘Settings’.
Please note, learners using Flickr will be subject to Flickr’s house rules and moderation processes rather than those of FutureLearn.
How to join a Flickr Group
- Create a Flickr account (see above).
- Join the course group on Flickr:
- Go to Communities (top-left menu bar) and search group, or go directly to the link provided on the course step.
- Select Join Group (next to group name).
- First upload the images to your account and add title, description and tags. This data helps users to find and understand your images. It’s important to use keywords that describe your images. Try to anticipate what keywords users would put into the search engine if they were searching for your image.
- Give the image a description that includes the subject matter, FL platform, the name of the course, and any special notes for consideration. For example: “This is an image of XX for the FutureLearn course Improving your image: dental photography by University of Birmingham. The image reveals XXX.”
- Use tags to describe the image – these should be separated by a space. You should include the course hashtag here too.
- To submit an image to the Flickr Group, either go back to the Group page and click on the ‘add photos’ button next to the title of the Group, or to submit it from the image itself, open the image and then choose ‘add to a group’ from the ‘more’ menu (three horizontal dots).
How to use Padlet
Some educators may set up ‘Padlet Walls’ as places for you to share media like images or text with other learners.
Padlet is free to use, does not require you to create an account, and works on most devices including desktop, mobile and tablet.
Accessing Padlet
To view a Padlet Wall or add something to it, follow the link from a course step and enter the password you have been given if prompted. The password is to keep the wall private to learners and educators on the course, though you should still not post anything that is personal or sensitive.
Posting an item to Padlet
Whatever you’re posting, remember to add your name (this should be the same name you use on FutureLearn) and possibly a title and short description to help others understand what it is.
On desktop:
If you’re uploading an image of your own, you can simply drag and drop it on to the wall.
Alternatively, double-click anywhere on the wall.
This will reveal a new area where you can:
![]() choose to upload a file
choose to upload a file
![]() link to a file that’s already on the web
link to a file that’s already on the web
![]() or even use your webcam to take a photo .
or even use your webcam to take a photo .
To remove something you’ve posted, double-click on it to reveal this icon at the top right ![]() and click it to delete.
and click it to delete.
On tablet and mobile:
Double-tap anywhere on the wall.
This will display a new area where you can choose to upload a file ![]() or link to a file that’s already on the web
or link to a file that’s already on the web ![]() .
.
If you choose to upload a file, tap in the ‘click to browse’ box to select an image from your device.
To remove something you’ve posted, double-tap on it to reveal this icon at the top right: ![]() and tap it to delete.
and tap it to delete.
You can get more help and tips about using Padlet from within any wall itself – just click or tap the ? button at the bottom of the right-hand toolbar.
Sharing video with others on FutureLearn
As with images, some educators may ask you to create videos and then share them with other learners on FutureLearn.
To do this, first upload the file to a video-hosting service, and then paste the URL of your video (you can copy this from your browser’s address bar while viewing the video) into a comment, reply or assignment on FutureLearn. It will be automatically turned into a link and highlighted in pink.
We normally recommend that learners use a free YouTube account, but you are welcome to use other services such as Vimeo, Flickr, or wherever you prefer. Just be aware that the free accounts on these services often have limitation on length and filesize, and that your video will need to be viewable on mobile devices as well as desktops.
Check the privacy settings
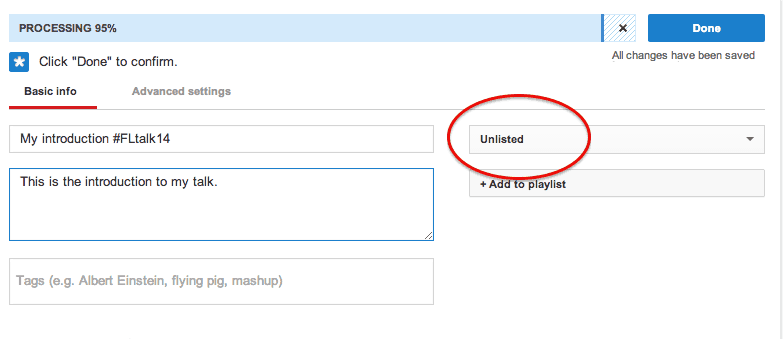
Wherever you choose to host your video, if you’re going to share it with other learners, make sure you check the privacy settings for your account or video first. For example, your video uploads may be set to private by default.
On YouTube, we recommend setting the privacy level for your video to Unlisted (see below). This is ideal as it means your video can only be viewed by people to whom you’ve given the link.