
Installing libraries
In this article we introduce the Python and standard library, and the idea that Python can be extended using external packages. We mention several ways you can install packages on your machines, and finally introduce the idea of Python environments.
Python Standard Library
Python comes with a set of core commands and functions common to all users of Python, some of which you may already be familiar with, such as ‘print’ to display text and numbers on the screen, and ‘open‘ to open a file.
This set of core functions is known as the standard library. For a complete list of all the contents of the standard library you can see the online documentation https://www.python.org/doc/, but there’s no need to learn everything there as anything you need for this course will be introduced as the course progresses.
External Packages
While you can achieve a lot with the standard library, much of the power of Python comes from a large range of additional libraries, also referred to as packages or modules, which can be downloaded and installed in addition to the standard library.
In general a module is an individual file possibly containing several functions or classes, while a package is a collection of modules, and a library is a collection of packages. But don’t get too hung up on the terminology as the terms are often used interchangeably.
External packages contain code and functions specific to achieving certain tasks. For example, the package Matplotlib is widely used for plotting data, while Numpy (Numerical Python) and Scipy (Scientific Python) are used for mathematical and numerical operations. Other libraries are useful for dealing with specific types of data, such as Pandas, which deals with manipulation of tabulated data, or OpenCV, which can manipulate image data.
If you’ve installed Anaconda along with Python as we recommend you’ll find many of these commonly used external packages are already installed in your ‘base’ environment (more on environments later). An important exception that we’ll need for this course however is OpenCV (short for open source computer vision). This is written in C++ (another programming language) but a version can be installed and used using Python. We’ll now show you how to install it using a program called pip.
Pip
Perhaps the most common way to install Python packages is by using a command line program called pip. This is the package installer that is included with almost all Python installations and uses the PyPI (Python Package Index, https://pypi.org/project/pip/), a code repository containing numerous useful packages.
Basically, the purpose of programs like pip is to make installing new packages super easy. They get the latest version of all the package files for you from the internet, and make sure any other files you have which may be needed are also up to date.
To check you have pip installed and check the version number type the following in a command line window, such as Anaconda prompt:
python -m pip –version
If this prints out a version number rather than an error message pip should be ready for you to use. To make sure its up to date you can type the following:
python -m ensurepip –upgrade
To use pip you just need to type ‘pip install’ followed by the name of the package, and assuming pip can find it in the PyPI repository, it will install it.
If you visit https://pypi.org/project/opencv-python/ you can see that PyPI does have opencv listed, but it is named ‘opencv-python’. To install it then it’s just:
pip install opencv-python
Pip will then look for the package and any other co-requisite packages you might need to install along with it. If you do need further packages you’ll see a message on screen asking for permission to install them (‘Proceed Y/N?’ or a similar message). Type ‘Y’ to accept, then pip will try and install the packages you need.
To test opencv has installed correctly, start a Python shell by typing ‘python’ at the prompt. Then type:
import cv2
(cv2 being the name of the opencv module within Python). If you don’t see any output or errors, then all is well. To test it further type:
cv2.__version__
(with double underscore characters ‘__’ either side). All being well this should print out the version number you have installed.
Conda
If you have Anaconda installed you will also have access to its own command line package manager program, conda. As with pip its simple to install new packages with conda. Just type ‘conda install’ followed by the name of the package, in this case ‘opencv’.
conda install opencv
Take care to get the name exactly right because if that exact name isn’t found in the index, conda won’t be able to install it. In this case you’ll need opencv rather than opencv-python (at time of writing).
As before, assuming conda can find the package, it will check for any dependencies that also need to be installed and give you the option ‘Proceed ([y]/n)?’. To proceed just type ‘y’ and hit enter. And that’s it, the packages will be installed (with a progress report) and you will be returned to the command prompt. At time of writing the version of OpenCV available via conda is an older version so we recommend using pip rather than conda to install it.
Conda or pip
The difference between installing using conda versus using pip is subtle but important. Pip installs packages as source code from PyPI (the Python Package Index) meaning they are written for Python, and will also require your machine to have the correct compilers for the language the packages are written in. If the package only contains Python code this shouldn’t be any problem, but if not installing packages using pip might cause problems.
Anaconda/conda on the other hand, installs packages from the Anaconda repository channels such as conda-forge, as binaries meaning they can potentially be written for any programming language. This means there is a larger range of packages is available via Anaconda. Anaconda will automatically download the correct version for your hardware and programming environment.
Generally speaking however, this isn’t something you need to worry about too much. As long as you have successfully installed Anaconda and OpenCV then you will have all you need for the purposes of this course.
(For more on the difference between pip and conda see https://www.anaconda.com/blog/understanding-conda-and-pip.)
Anaconda Navigator
If you have Anaconda, one final way you can use to install and manage Python packages is using the Anaconda Navigator, a graphical user interface programme that comes installed with Anaconda.
When you open it up the main window on the right will be initially set to ‘home’, which shows a list of applications packaged with Anaconda that you can choose to launch from the Navigator if you wish (though you can generally launch them directly without using the navigator). The only ones we’ll use in this course are the Command Prompt which opens a terminal window, and Spyder which is a fully-functional IDE. Feel free to investigate the homepage further, but to install and manage Python packages you need to access the ‘Environment’ window which you get to by clicking on the panel on the right (below Home).
Clicking on this brings up a new window with two panels. On the left will be a list of so-called Environments, while on the right is a list of packages associated with the current environment. At the moment there’s just one environment, named ‘base(root)’, which is set up automatically when you install Anaconda. We’ll talk more about environments, and setting up environments in the next section, but for now the important thing to note is the window on the right.
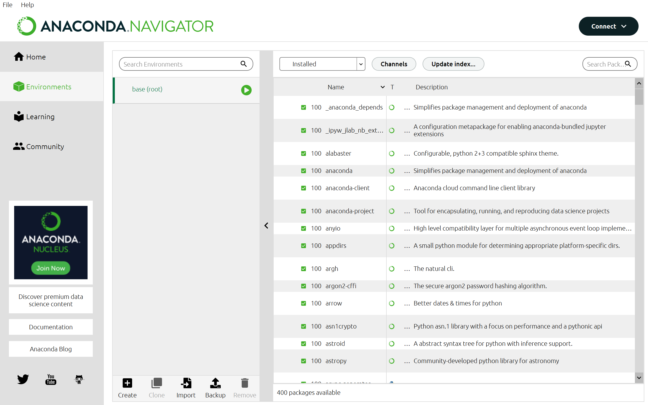
Initially this should show a list of installed packages, and at the bottom it will give you a count of the number of installed packages – in this case there are 400 packages installed. If you scroll down the list you’ll see that Anaconda has pre-installed several packages we’ve mentioned already, including matplotlib, pandas, and scipy.
If you want to try installing and managing packages using the Anaconda Navigator we recommend looking at the online guides provided by Anaconda, for example https://docs.anaconda.com/anaconda/navigator/getting-started/.
Environments
Sometimes, especially if you are working on multiple data science or programming projects at once, that require several external packages, you might encounter conflicts between the different versions of packages and package dependencies. You might even encounter software that only works using an older version of Python, such as Python 2 rather than 3. Anaconda can deal with this using environments. Note though, it is fine to skip this section for now if you don’t follow – you can return to it later if needed.
As the name suggests, these are isolated environments you can switch between in which different packages, different versions of packages and even different versions of Python can be used. It’s simple to create a new environment in the Anaconda Navigator. Just click on the ‘Create’ button at the bottom of the environment panel, which brings up the following window.
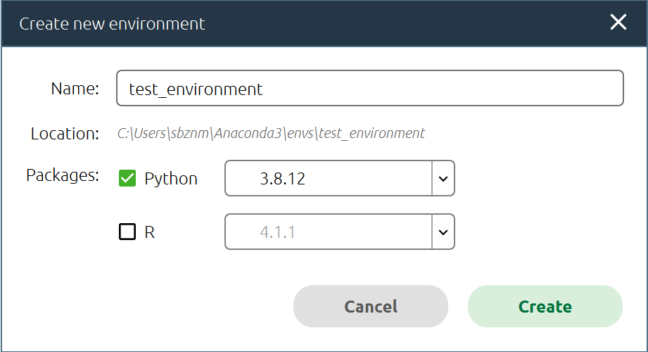
Just add a name of your choice and select the version of Python you want to use (there’s also an option to include a version of R, another programming language, if you want), then click ‘Create’. Now when you look at the list of installed packages, you’ll notice a greatly reduced set of packages installed, so anything you need not in this limited list will have to be installed manually.
To switch between environments in the Anaconda navigator, just click on their names in the list. To open a command prompt in the selected environment, click the green ‘play’ button next to the name in the list.
Environments in Conda
You can also create environments via the command line using conda.
To make a new environment called test_environment:
conda create --name test_environment
Then to enter the new environment you need to activate it:
conda activate test_environment
When you open an Anaconda prompt you might have noticed the (base) before your current location and the prompt. This indicates you are currently in the base environment. Now, once you activate the new ‘test_environment’ you should see the name ‘(test_environment)’ in brackets before the prompt. So anything you do here will be in the new environment leaving base unaffected (and vice versa).
To go back to ‘base’ you just need to activate it:
conda activate base
Some other useful commands in conda
To list the packages installed in the current environment:
conda list
To list all the available environments:
conda env list
For a summary of yet more commands in conda see: https://docs.conda.io/projects/conda/en/4.6.0/_downloads/52a95608c49671267e40c689e0bc00ca/conda-cheatsheet.pdf
Introduction to Image Analysis for Plant Phenotyping


Introduction to Image Analysis for Plant Phenotyping
Reach your personal and professional goals
Unlock access to hundreds of expert online courses and degrees from top universities and educators to gain accredited qualifications and professional CV-building certificates.
Join over 18 million learners to launch, switch or build upon your career, all at your own pace, across a wide range of topic areas.


