
Python and guizero: Intro to boxes
In this article, we are going to look at a specific kind of widget called a Box and learn how it can be used to control the layout of our GUI.
What is a Box?
A Box is a widget that acts as a container for other widgets. It is invisible by default and can be used to more easily place other widgets and alter their design.
You can create a Box in the same way that other widgets are created. The following code creates a Box called box which is part of the App called app:
from guizero import App, Box
app = App()
box = Box(app)
app.display()
When you create a box, you can set several starting parameters:
-
master: This describes where the Box is contained; in the above case the Box is contained inapp.
-
align: This is used in the ‘auto’ layout to describe where the box will appear in its container — we’ll learn more about this later this week.
-
grid: This is used in the ‘grid’ layout to describe where the box will appear in the grid — again, we’ll learn more about this in a later step.
-
layout: This parameter describes how widgets inside the Box are laid out, i.e. in a ‘grid’ or ‘auto’ format. We will look at these two formats in more detail later this week and in Week 3.
-
visible: This parameter determines if the Box will be visible, which it is by default.
-
enabled: This parameter determines whether the Box will be enabled; if you don’t set this parameter it will take the same value as the same parameter for the master widget housing the Box.
-
widthandheight: These parameters describe the size of the box; they can be set to"fill"or specified in pixels.
-
border: This parameter determines the thickness of the border of the Box; the default is zero (i.e. no border), and a border can be made either by setting this parameter toTrueor to a number greater than 1.
A Box is not visible until it houses a widget. We will now look at how to add a widget to a Box and then we can see what happens when we change some of the above parameters.
Putting something in a Box
If you want to place a widget inside a Box, you simply set the master parameter of that widget to the name of your Box — this is the first parameter inside the brackets. For example, in the following code the PushButton is placed inside the Box:
from guizero import App, Box, PushButton
app = App()
box = Box(app)
button = PushButton(box)
app.display()
Multiple widgets can be housed in the same Box. Try adding another PushButton (or a different kind of widget) to your Box.
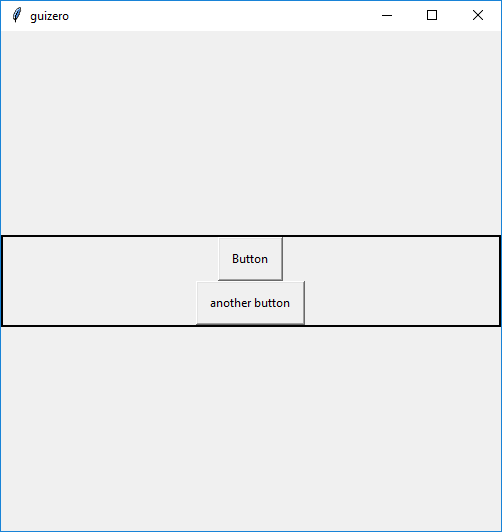
We will now create a new Box and change some of the starting parameters. Before you run the following code, try to imagine how it will appear different to the app we created above.
from guizero import App, Box, PushButton
app = App()
box = Box(app, align="left", width="fill", border=2)
button = PushButton(box)
button1 = PushButton(box, text="another button")
app.display()
As we will see this week, Box widgets are extremely useful. They come in handy when attempting more sophisticated GUI layouts and can be used to position multiple widgets at the same time; we will see this in a later step. They are also useful when creating lots of widgets that all need to look the same, as we shall see in the next step.
Challenges
-
- Create an app that contains three boxes of different sizes.
-
- Change some more starting parameters of your boxes.
-
- Create three more widgets and place each one inside a different Box. Can you guess what the app will look like before you run your script?
Note: Code in comments should be enclosed in tilde characters (~~~) — three tildes before and after the code. Refer to our ‘Sharing code on FutureLearn’ guide for more information.


Reach your personal and professional goals
Unlock access to hundreds of expert online courses and degrees from top universities and educators to gain accredited qualifications and professional CV-building certificates.
Join over 18 million learners to launch, switch or build upon your career, all at your own pace, across a wide range of topic areas.


