Skip main navigation

New offer! Get 30% off your first 2 months of Unlimited Monthly. Start your subscription for just £29.99 £19.99. New subscribers only. T&Cs apply

Find out more

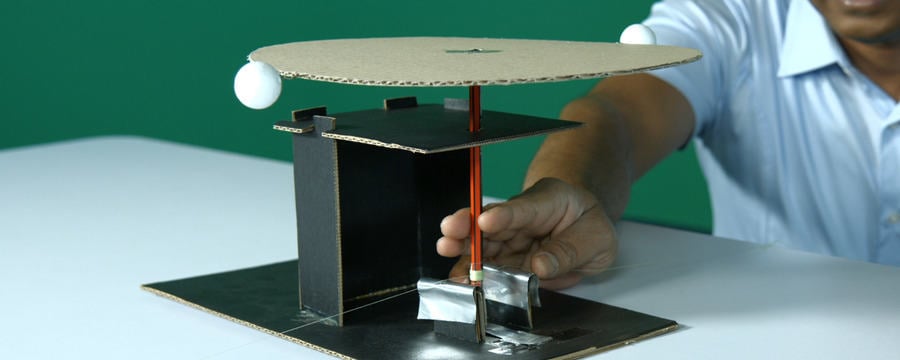
Experiments on air resistance

It's near the end of this MOOC, so you'll probably sit this one out and just watch the video.
9.9
This experiment is a bit different. It’s a simulated wind tunnel test. As usual, we supply full instructions for doing it at home, but this requires advanced cardboard engineering. This is the rig. Can you see how it works? The test items are these Styrofoam balls on straightened-out paper clips. Air flows past them when the circular cardboard disc rotates. The circular cardboard disc is attached to the top of a pencil that is held in bearings. The top bearing is a hole in a cardboard plate. It’s a loose fit. The bottom bearing is a well-sharpened 2B pencil, running in a dimple made in a piece of aluminium cut from a baking tray.
59.8
The rotating assembly is driven by two weights through two lengths of fine sewing thread that go over the edge of the table. We’ll have to account for the friction loss where the string goes around the edge of the table, like we did in the rolling resistance test.
76.9
We’ll use this rig to measure the air drag on Styrofoam balls and on cardboard discs. There will be drag from the rotating disc itself without the test items, so to adjust for this, we’ll start with a test with a bare disc with wire supports, but no test items on it. We can subtract this datum drag from the main test to get the drag on the balls alone. A small weight is sufficient to drive the bare disc - same both sides, of course. With just the disc and the wires, we measured the time it took for the weights to fall a known distance after it reached steady speed. We recorded all the measurements. Next, we added the Styrofoam balls.
129.9
We kept repeating the experiment with increasing weights, until the time to fall the measured distance was the same as the time with the bare table. We recorded our results. Can you see why we did it this way? We’ll explain it in the analysis. We also did tests with cardboard discs. Again, we added weights until the time to fall was the same as with the bare disc. We measured the time it took for the weights to fall a known distance after the disc reached a steady speed. We arranged this by placing a chair near the falling weights. By the time the weights reached the chair, the disc was at steady speed.
178.6
We then measured the time it took to reach the floor.
185.1
You will get the data later on. What does it all mean? It’s time for analysis.

It’s near the end of this course, so you’ll probably sit this one out and just watch the video.

It’s advanced cardboard engineering, and full of subtleties. You’ll reflect on it in the course review next week. For now, watch the tests and understand the rig.

You can download instructions to the experiment in the Downloads section below.

Talking points

  • We really enjoyed building and using this rig. What was your reaction to this experiment?

Share your experiment

If you attempt the experiment, take a photo and upload it to our Through Engineers’ Eyes Padlet wall. You can include a link to your photo in the comments for this step (click on your post on the Padlet wall and then copy the web address).

This article is from the free online

Through Engineers' Eyes: Engineering Mechanics by Experiment, Analysis and Design

Created by
FutureLearn - Learning For Life

Reach your personal and professional goals

Unlock access to hundreds of expert online courses and degrees from top universities and educators to gain accredited qualifications and professional CV-building certificates.

Join over 18 million learners to launch, switch or build upon your career, all at your own pace, across a wide range of topic areas.

Start Learning now