
How to implement quality management
To ensure that work is performed accurately and consistently, it is important to put quality management systems in place (Figure 1). This limits error and expedites troubleshooting, thus saving resources on repeating failed experiments. Here are some ideas and suggestions for ensuring high-quality testing of SARS-CoV-2 samples.

Figure 1 – Example quality management system flowchart
Single-use aliquots and batch numbers
Create a reagent spreadsheet (Figure 2). Split your reagents into single-use aliquots and assign a unique batch number. Give each reagent a sequential ID i.e. QA-001, QA-002, and label with the relevant information (e.g. ID, expiry date and volume). Some reagents, such as a large bottle of nuclease-free water, cannot be completely dispensed in one go. To ensure multiple aliquot events from the same bottle are captured, assign each aliquot event with a sequential letter, i.e. QA-001-A, QA-001-B. Without this, it could seem as though a fresh bottle of water had been used for each set of aliquots, which could cause confusion when troubleshooting.
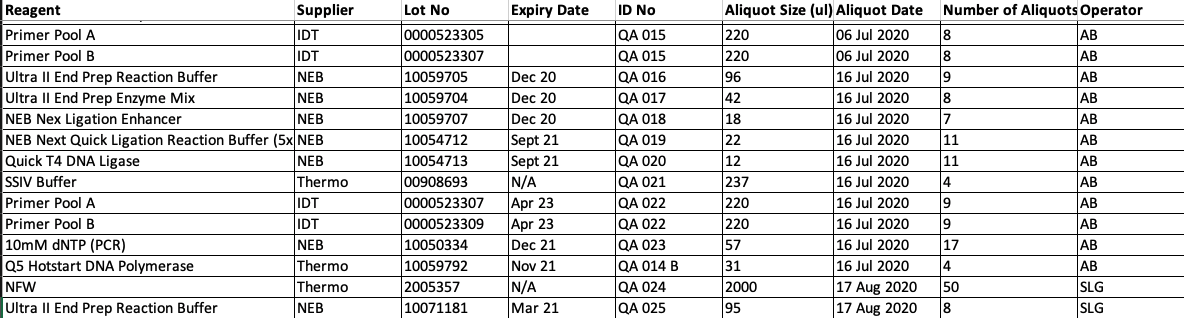
Figure 2 – Example reagent directory
Record Keeping
The majority of good quality management is record keeping. The more detail you can record when performing your experiment, the easier it is to troubleshoot.
Assign each library a unique ID, i.e. EXP-001, EXP-002, as this makes it much easier to track experiments. Create a detailed experiment plan (Figure 3).

Figure 3 – Example of an experiment plan
Create a way of capturing all the information for each library preparation. One method is to create tick-sheet versions of the protocols (see additional resources) with space included to record all reagent batch numbers, DNA quantifications and calculations. Whenever something does not go to plan, this should be recorded. The tick sheet can be fixed to the outside of the cabinet with a magnet, and each step crossed off as you go, thus reducing the opportunity for error. Paperwork should be checked and counter-signed by another member of staff to capture any errors.
Equipment
Ensure that equipment is well maintained, calibrated, and that staff have been properly trained in how to use it. Assign equipment unique equipment numbers, i.e. UE-001, UE-002. Record which specific items of equipment you have used throughout your experiment to help expedite troubleshooting.
Training
To reduce variation in results between operators, give all staff members the same level of training. Ideally, the protocol should be observed first and then performed with supervision until the staff member is able to perform the work without any guidance.
Consider training staff in pipetting techniques to ensure consistency and accuracy. Holding the tip vertically, having a 1cm immersion depth, and pre-rinsing tips to break surface tension before aspirating can all improve accuracy (Figure 4). For small volumes and repeat pipetting the reverse pipetting technique can be useful.

Figure 4 – Accurate pipetting diagram
Quality Control Checks
Include negative and positive controls and take them through your whole process from reverse transcription to library preparation. After the PCR step, quantify the negative and positive controls on the Qubit Fluorometer (or equivalent method) and look for irregularities. It is important to also test a couple of samples, including both primer pools. Ensure that both primer pools have similar DNA concentrations. If reagents have not been properly mixed before dispensing this can lead to an imbalance between the primer pools. Controls are essential for quality management and for troubleshooting.
A Practical Guide for SARS-CoV-2 Whole Genome Sequencing


A Practical Guide for SARS-CoV-2 Whole Genome Sequencing
Reach your personal and professional goals
Unlock access to hundreds of expert online courses and degrees from top universities and educators to gain accredited qualifications and professional CV-building certificates.
Join over 18 million learners to launch, switch or build upon your career, all at your own pace, across a wide range of topic areas.


