
Configuring Octopus – The Project
You now have an understanding of the environment and related requirements, machine role and lifecycle when it comes to configuring Octopus. In this step, you will learn about project in Octopus.
A project defines what is deployed and how it is deployed. It is a recipe for how your applications are deployed.
With a defined project, you can create a release and deploy it to environments. You can grant different permissions to a project to define who has access, who can edit it, who can create releases, and who can deploy it.
A project can also belong to a project group, which is a way of visually grouping projects.
Process
Each project has a defined list of actions that Octopus executes when a project is deployed. This is called the deployment process.
The deployment process is like a recipe. It defines what is executed, in which order, and the parameters with which the actions are executed.
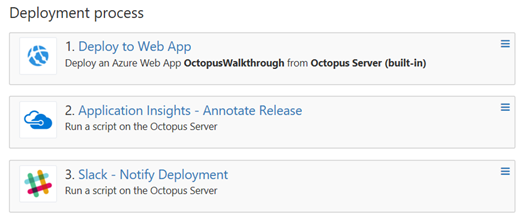
The executed actions are called steps.
Octopus provides out-of-the-box-steps and you can define your own steps or install steps made available by the Octopus user community.
Variables
A deployment pipeline should be repeatable and consistent. The same binaries should be deployed to all environments and the same process should be equally executed in all environments.
As applications are promoted across environments, that is, from development until it reaches production, with other environments in between, there will be differences. These might include different database connection strings, application settings, service URLs, domain names and parameters.
Variables are essentially the glue that supports parameterisation per environment, allowing you to maintain the same process while applying different values if needed.
The variables are used in the application deployment by the appropriate steps. For example, a step to deploy an ASP.NET application might use a variable to set the database connection string on web.config.
This allows you to develop applications and deployment scripts that are agnostic of the environment to which they are deployed.
Variables are name/value pairs that can be scoped to be applied in different situations. For example, they can be scoped to environments, roles, targets, or steps.
Variables can be passed to steps using the #{variableName} syntax. More complex syntaxes are also supported. You can use conditional constructs, repetition, filtering, JSON parsing and other constructs.
Besides defining variables at the project level, you can also define them at the tenant level or define global variables that can be shared among all projects.
There are also other types of variables, such as the system variables defined by Octopus.
Triggers
You can define unattended behaviour with triggers. A trigger allows you to define an action to be executed when an event occurs. The events can be filtered so that the action is only triggered when the conditions are met.
You can set the filter by event groups, such as:
- Machine events
- Machine critical-events
- Machine becomes available for deployment
- Machine is no longer available for deployment.
This means that the trigger will be fired by any event on any given group, or you can filter by specific events.
Currently, only automatic deploy triggers are supported. For example, you could use a trigger to automatically deploy a project when a machine is added.
More trigger types are planned.
Releases
A release is a nuclear concept in Octopus. When a release is created, a snapshot of the project is created. The release however still belongs to the project. Everything that is needed to deploy a project is copied to the snapshot, for example, the steps and the variables are copied.
A release has a version associated with it and can be deployed to environments in a repeatable way. If a project property (a process change or variable, for example) is changed after a release is created, the release is unchanged. This means that if a release is deployed after a change is made and the change occurred after the release was created, then the release will be deployed by using the deployment process at the time the release was created.
Releases are versioned using the semantic versioning scheme.
Channels
Channels are a powerful way to model multiple scenarios without having to create and maintain variations of the same process by creating multiple copies.
You can use channels to support delivering hotfixes directly to production, to support beta versions to some customers and to deploy different versions of the same project at the same time. This might include supporting V1 and VNext at the same time or support V1 while developing VNext at the same time, among many other scenarios.
A release can be placed into a channel after which you can configure different behaviours by channel. For each channel, you can:
- Define which lifecycle is used
- Define which steps are executed per channel
- Scope variables to channels
- Define which tenants are included in the channel.
Settings
Settings allow you to configure the basic settings of a project, such as a project name or description. You can set advanced settings such as the project’s project group or the project versioning scheme, whether the packages are always redeployed or skipped if already installed or if the project supports multitenancy.
A project can also be disabled, which prevents release creation.
We have now completed Octopus Architecture, Installation and Configuration and in the next activity, we will learn about Octopus Packages. Before you move to this, please take part in the discussion.
Join the discussion
When it comes to project in Octopus, you can grant different permissions as to who has access, who can edit it, who can create releases, and who can deploy it. Discuss the advantages and disadvantages of this.Use the discussion section below and let us know your thoughts. Try to respond to at least one other post and once you’re happy with your contribution, click the Mark as complete button to check the step off, then you can move to the next step.
Microsoft Future Ready: Continuous Integration Implementation

Microsoft Future Ready: Continuous Integration Implementation
Reach your personal and professional goals
Unlock access to hundreds of expert online courses and degrees from top universities and educators to gain accredited qualifications and professional CV-building certificates.
Join over 18 million learners to launch, switch or build upon your career, all at your own pace, across a wide range of topic areas.


