Skip main navigation

New lower prices! Get up to 50% off 1000s of courses. 

Explore courses

Configure Outlook Add-In

In this step, we will cover some of the things to be aware of if you are working on a deployment with the Dynamics 365 add-in for Outlook, an older in

In this step, we will cover some of the things to be aware of if you are working on a deployment with the Dynamics 365 add-in for Outlook, an older integration that will be phased out in time.

The Dynamics 365 for Outlook is an Outlook add-in that is physically installed on a client machine that is running the Outlook desktop client. This add-in uses older integration technology to work with Outlook.

This differs from the Dynamics 365 App for Outlook that was covered in the prior topic that uses the modern Outlook integration technology. The Dynamics 365 for Outlook discussed in this topic will continue to be supported but will not receive the new features.

Review the continued support announcement Continued support for Outlook add-in for more details.

New deployments should use the new Dynamics 365 App for Outlook where possible.

In this topic, we will cover some of the things to be aware of if you are working on a deployment with the Dynamics 365 for Outlook.

The Dynamics 365 for Outlook allows access to the Customer Engagement app from within the context of the Outlook application.

Additionally, it provides support for tracking email, appointments and tasks without having server-side synchronisation installed. Offline support for Dynamics 365 data is also a key feature.

Dynamics 365 for Outlook also enables Microsoft Word mail merge with Dynamics 365 data.

Installing Dynamics 365 for Outlook

Dynamics 365 for Outlook must be installed on each user’s computer and then needs to be configured. To perform the installation on the computer you must have the ability to log on to the computer as a local administrator.

In addition to the installation using the installer, you can also install from the command prompt or using System Center Configuration Manager (SCCM).

Configuring

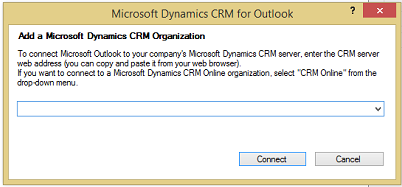
After the install completes you will see the following dialogue box prompting to configure the app.

Microsoft Dynamics CRM for Outlook pop-up with a message reading ‘Add a Microsoft Dynamics CRM organization: To connect Microsoft Outlook to your company’s Microsoft Dynamics CRM server, enter the CRM server web address (you can copy and paste it from your web browser). If you want to connect to a Microsoft Dynamics CRM Online organisation, select “CRM Online” from the drop-down menu.’

You can cancel at this point and run the configuration later. You can also configure additional eligible CDS environments by re-running the Configuration Wizard. You can do this from Start -> All Programs -> Microsoft Dynamics 365 for Customer Engagement Apps, and then click on the Configuration Wizard.

User Security Permission Requirements

To perform different actions with Dynamics 365 for Outlook, users must have appropriate security privileges on their assigned security roles. Many of the default Dynamics 365 security roles come pre-configured with the required permissions for the Dynamics 365 for Outlook.

If you are using only custom security roles you can see the permissions required by task Permissions required for Dynamics 365 for Outlook tasks.

Configuring Synchronisation

Dynamics 365 for Customer Engagement uses synchronisation filters to determine which records to synchronise with Outlook or Exchange (when server-side synchronisation is used).

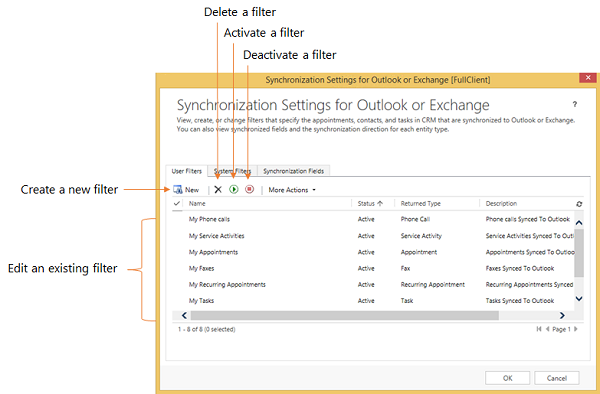
In Dynamics 365 for Outlook you can configure the settings via File -> Dynamics 365 for Customer Engagement apps – > Options. This will launch the following dialogue that allows you to configure the filters.

A screenshot of Synchronisation Settings for Outlook or Exchange window, with the options to ‘Delete a filter’, ‘Activate a filter’, Deactivate a filter’, ‘Create a new filter’, and ‘Edit an existing filter’ highlighted.

From here you can configure user filters, or if you have administration permissions you can configure System Filters and control the fields that synchronise. System Administrators can modify organisation-wide filters using the SDK or community tools.

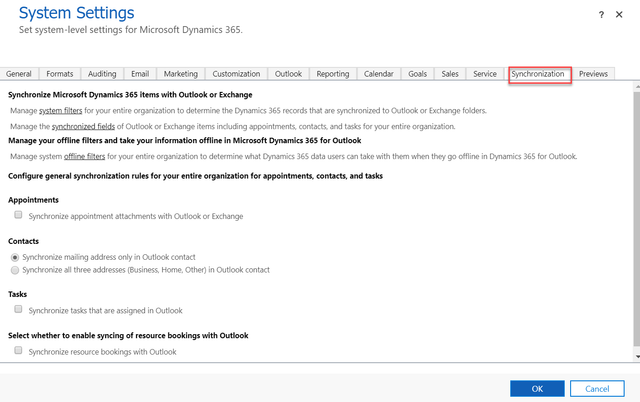
In addition to these settings, you can also configure additional system settings related to synchronisation. These can be accessed from System Settings – > Synchronisation tab. These settings control the rules for the entire organisation for Appointments, Contacts and Tasks.

A screenshot of the System Settings pane for Dynamics 365, with the Synchronisation tab, highlighted.

You can read more about the detail behavior of the options System Settings dialog box – Synchronization tab

Working Offline

Dynamics 365 for Outlook has the ability to take a subset of the overall data offline. Changes to the offline data are tracked and played back when the user connects to the server.

To use this feature, you must define what data to take offline and the user must have the Go Offline privilege. To define the subset of data Offline Filters are configured for the user.

If you have users working offline be aware that any automation you have configured to run will not trigger until the user connects back to the server and the record changes are applied.

This article is from the free online

Dynamics 365: Implementing Power Platform Integrations

Created by
FutureLearn - Learning For Life

Reach your personal and professional goals

Unlock access to hundreds of expert online courses and degrees from top universities and educators to gain accredited qualifications and professional CV-building certificates.

Join over 18 million learners to launch, switch or build upon your career, all at your own pace, across a wide range of topic areas.

Start Learning now