
Understanding Flexagons: Basic Pat Notation

So, you may know some of the basic terms for manipulating flexagons, but what about describing the entire structure of the flexagon?
Here is the mathematical language that Scott Sherman invented to do just this.
Leaf numbers and folding numbers
In the image below, there are the two sides of a flexagon template. On each leaf there are two numbers. The positive and negative numbers on each leaf, those written in the brown boxes, are leaf identifiers. Every leaf has its own unique number, going from 1 to the number of leaves on one side and -1 to minus the number of leaves on the other. Since these are identifiers there is no real “meaning” to the numbers, it’s just a way of distinguishing between different leaves. Therefore, there are different ways you can number them. One well-known way is to number the leaves sequentially along the template. Another one, is to first fold the flexagon, then number the leaves sequentially, going clockwise, starting from the place you want to flex from. There are other ways to number the leaves and some people use letters instead of numbers. Whatever numbering system you use really doesn’t matter that much, as long as each leaf has its own identifier.
The other numbers coincide with the colors. These also useful when folding the flexagons. Usually folding is done from the largest number to the smallest, folding two leaves with the same folding number face to face. That’s why the same folding number appears on at least two leaves. The folding numbers 1 and 2 that make up the main state, the state/shape that we get when we fold the flexagon according to the “folding numbers”, appear on as many leaves that make up the face that you get when you first fold the flexagon. So there will be six 1’s and 2’s on the hexaflexagon template, five 1’s and 2’s on a pentaflexagon template and so on.
To summarise, when discussing pat notation, Do not be confused with the folding numbers and different colors.
The leaf numbers that we use to describe the flexagon’s structure using pat notation, are those unique numbers going from 1 and -1 to the number of leaves on the template.
Pat structure example
Here are the top and bottom sides of a flexagon. Print and cut out the templates so that you can examine it as a template and as a folded flexagon (the templates are below – template number 6 in the flexagon booklet)).
Important! Notice that there is a solid line between the two triangles coloured blue (1) and green (2) respectively, numbered 2 and 7 on the top side of the template (-2 and -7, naturally, on the bottom side). This means that there is a cut here. You cut along this line before folding the flexagon. Folding is done along dotted lines on the template.
Fold the flexagon into its main position where all the blue faces (also marked with the number 1) are on top. To do this fold every two leaves with the same folding number together, going from the largest folding number until the number 3, included, so first fold the two purple (5) faces on the bottom side of the template together, then fold the two yellow (4) faces on the bottom side of the template together and then fold the two brown (3) faces on the bottom side of the template together (this can be done because of the cut we did before folding).

Notice that at least some of the leaves are folded in pats that contain more than one leaf. When the flexagon in the example is folded it looks like this:
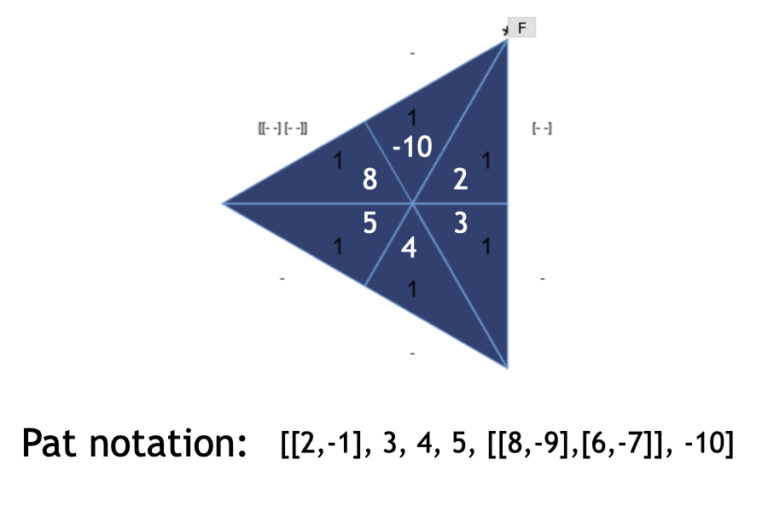
Look at the folded flexagon in the image above. The sequential numbers are not in order any more. Starting clockwise from the vertex marked with an asterisk (*) and the letter F (This is the vertex from which a flip flex can be performed), we see the sequence: 2,3,4,5,8,-10. But some of these are pats, not individual leaves.
Square brackets indicate a pat. In each bracket, the leaf identifiers of the top-facing leaves of the pat are written, separated by a comma.
The first pat is labelled [2,-1]. This means that the pat of triangles is two leaves thick, the top face of the top leaf facing us is labelled 2 (with its other side labeled -2), and the top face of the second leaf labelled -1 (with its other side, the face that we see when we turn the flexagon over, labelled 1).
Then, come several single-leaf pats, labelled: 3, 4 and 5. There opposite side is labelled : -3, -4 and -5, which you can see if you turn the whole flexagon over.
Then comes the pat: [[8,-9],[6,-7]]. The blue (1) triangle labelled 8 is facing us. It’s bottom purple (5) side is (naturally) labelled -8. Then comes the purple (5) -9 leaf facing us, with its other yellow (4) side labeled 9. Then comes yellow (4) labelled 6 facing us again, its bottom brown (3) -6. The last leaf of the pat facing us is brown (3) and labelled -7, with its bottom green (2) side labelled 7 . This is the leaf we see if we turn over the flexagon. In fact, if we turn over the flexagon and notate the pat again, we’ll see its the same notation written right to left with the signs reversed: [[7,-6],[9,-8]].
Recalling that ^ means: turn over the flexagon, we can generalise the last sentence into mathematical terms using the notations we’ve learnt so far: [a,b] ^=[-b,a]
This is just one small example of how powerful mathematical notation can be.
The last leaf is the single leaf, -10.
Sometimes, we’re just interested in the structure and not the actual identity of the leaves, we can just write a dash instead of the numbers and omit the comma. This is what’s written in the figure at certain points outside the flexagon.
- – means that the pat is a single leaf.
- [- -] means that this is a pat of two leaves.
- [[- -] [- -]] means that the pat has within it two 2-leaf sub-pats.
What about flexing this flexagon?


Reach your personal and professional goals
Unlock access to hundreds of expert online courses and degrees from top universities and educators to gain accredited qualifications and professional CV-building certificates.
Join over 18 million learners to launch, switch or build upon your career, all at your own pace, across a wide range of topic areas.


