
Adding custom 3D models
- How to add custom 3D objects to our assets folder
- How to load .gltf models
- Applying the model to an A-Frame entity
Adding 3D models
Welcome to the last week of this course! In this final week, we will primarily focus on polishing our experience and experimenting with new tools and components. At this point, you have learned all of the necessary foundational skills to construct your own WebVR experiences. One of the best ways to practise from this point on is to continue with hands-on experience. Try creating new games or tackling complex components!
In this lesson we will learn: – How to add custom 3D objects to our assets folder – How to load .gltf models, and check they aren’t corrupted – Applying the model to an A-Frame entity
What are 3D models?
3D models are a collection of data that represents the shape of a certain object. This data is a collection of vertices, edges, and faces. When this data is combined, it can create any shape imaginable.
3D models are used in almost all forms of digital media. From educational software to video games and high-budget movies. They can be as simple as a rock on the ground, or a fully built cabin in the woods.
Each of the primitive shapes used in A-Frame is also a 3D model. However, we are very limited to the shapes that are given to us. How could add more complex and intricate 3D models?
Downloading a 3D model to our assets
One option would be to create the models yourself. There is plenty of different free and accessible software out there that will allow you to create your own models. Blender is an amazing tool that is free for anyone to use, however it can be quite complex.
Some other free alternatives to use are: – Tinkercad – No download required. Also very useful for 3D printing – Google SketchUp – Slightly more complex and allows you to manipulate shapes better. Better for constructing static objects like buildings.
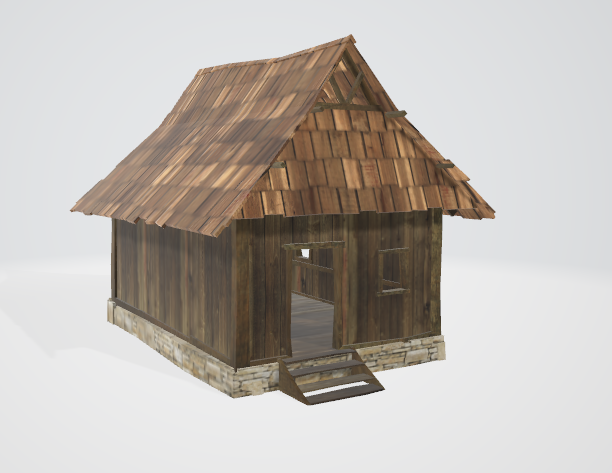
Alternatively, you can also download or purchase 3D models to use in your applications. TurboSquid has some great 3D models, with some being free to download and use too (Like the cabin above). SketchFab is also another great site to find and download 3D models from.
Try creating or downloading some 3D models that you think will suit your webVR experience.
Note: Try and download or export models with the .gltf extension. If you can’t, we will discuss a solution to this shortly.
Checking the file format
To load 3D models into our A-Frame experience, we have to make sure the file has the correct file extension. Many 3D models will likely come with the format .fbx or .obj. While these file extensions are great for most 3D applications, A-Frame can only load models with the .gltf extension.
If your downloaded files do not have a .gltf extension, there are a couple of ways you can convert them.
Using Blender
If you have Blender installed on your device, you can import the 3D model into the scene. Make sure to select the correct file extension to match the file downloaded.
Select the 3D model (Drag a box around the whole model), and click on File -> Export. Select gltf 2.0
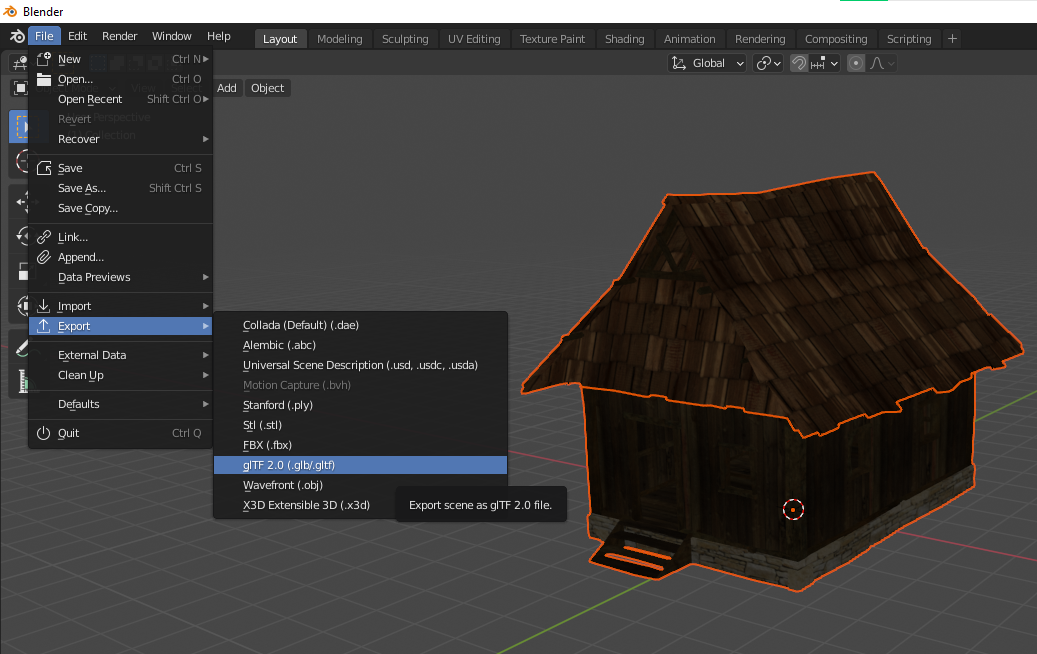
Once here, make sure to change the format to gltf embedded (.gltf). Then click on Export.
Online solution
Online solutions that can convert file types exist too. Though sometimes these won’t work as well as dedicated programs. If you would like to try using an online system instead, try using aspose.app. This allows you to convert 3D models from almost any file to another.
However, you may still run into issues such as materials not being preserved. But now that you know how to add your own custom materials, this might not be a huge problem.
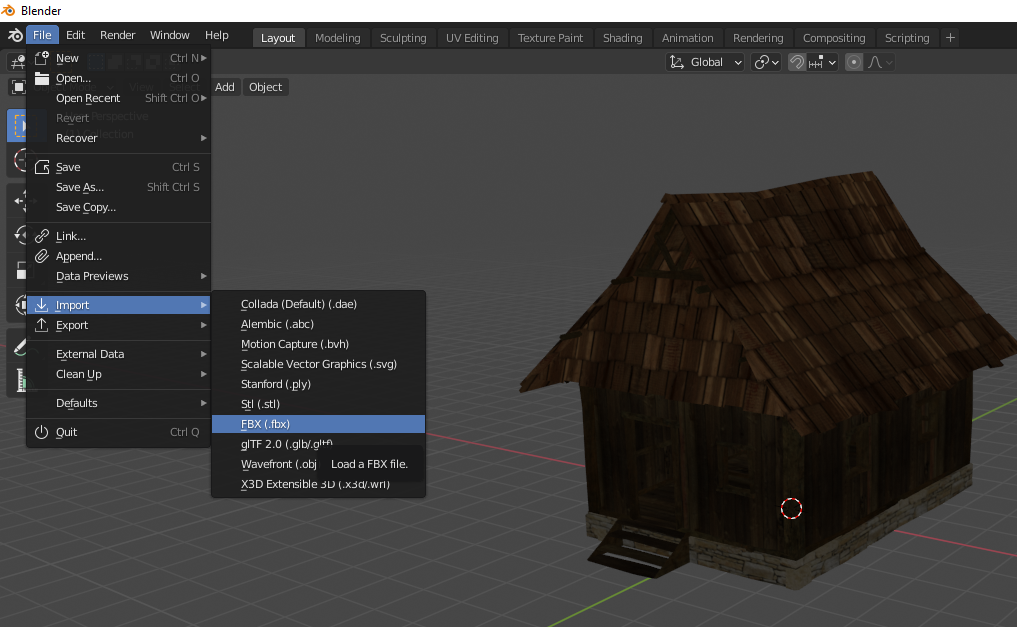
Loading the file into our assets
Loading a 3D model into our experience follows the same process as adding in an image or sound effect. Drag and Drop your 3D model file into your assets folder, and take note of the URL address needed for it.
To load the 3D model into A-Frame however, requires us to use a new tag. <a-asset-item> is required to load a .gltf file type. <a-asset-item> is used when we want to load any other type of file into our experience before the scene itself loads. <a-asset-item> has similar attributes to <audio> and <img>.
To load an <a-asset-item>, place the code between the <a-assets> section of the document.
<a-assets>
 <img id="WoodCrate" src="https://cdn.glitch.global/2f92b13e-90f2-4258-9464-269cc7d2374f/AFrameTexture_WoodenCrate.jpg?v=1654661799151">

 ...

 <audio id="CrateHit" preload="auto" src="https://cdn.glitch.global/2f92b13e-90f2-4258-9464-269cc7d2374f/crate-break-1.wav?v=1655353890513"></audio>

 ...

 <a-asset-item id="Cabin" src="https://cdn.glitch.global/2f92b13e-90f2-4258-9464-269cc7d2374f/WoodenCabinBlender2.gltf?v=1655445075415"></a-asset-item>

</a-assets>
Note: You may notice an increase in the loading time for your scene, as these files can be quite large.
Next, to load the gltf model onto one of our A-Frame entities, we add the gltf-model component. This component has only a single attribute that points directly to the model being used.
Create a new empty A-Frame entity, and add the gltf-model component to it.
<a-entity gltf-model="#Cabin" ></a-entity>
If everything loads correctly, you will see your new custom 3D model appear in your scene! If it’s not appearing, check:
- That the .gtlf model itself works. You can use babylonjs.com to upload your .gltf models and view them. If they appear correctly here, then the file itself is correct.
- That the URL and ID of the gltf model have been set correctly. Remember that the ID can be anything you want, but must be spelled the same when used in your
<a-entity>element. - The position and scale of your object. Because 3D models are usually made individually, sometimes the scale and position of the object can be hard to judge. Try scaling up or down the object by editing its
scaleattribute. e.g
<a-entity gltf-model="#Cabin" scale ="0.1 0.1 0.1" ></a-entity>
How to edit components of the model
Modifying a 3D model after it has been loaded can be a challenge for most 3D applications. To do so in A-Frame, we need to use Javascript. This Javascript function below looks at a 3D model, and edits each of the smaller objects that make up this model.
This is because all 3D models might be made differently. One author could create a complex model out of a single shape, while another might combine multiple individual shapes together.
If you would like to be able to change the colour (not texture) of your custom 3D models, then use the following code:
 <script>
 AFRAME.registerComponent('modify-materials', {
 init: function () {
 // Wait for model to load.
 this.el.addEventListener('model-loaded', () => {
 const obj = this.el.getObject3D('mesh');

 // Go over the submeshes and modify materials we want.
 obj.traverse(node => {
 if (node.isMesh){
 //Removes the 'texture' attached to the mesh
 node.material.map = null;

 //Changes the colour of the mesh (with or without a texture)
 node.material.color.set('blue');
 }

 });
 });
 }
 });
 </script>
Note: To use this function, attach the newly defined ‘model-loaded’ A-Frame component to an A-Frame entity.
~~~html
~~~
If you would like to edit how this function works, focus on this section of the code:
// Go over the submeshes and modify materials we want.
obj.traverse(node => {
 if (node.isMesh){
 //Removes the 'texture' attached to the mesh
 node.material.map = null;

 //Changes the colour of the mesh (with or without a texture)
 node.material.color.set('blue');
 }
});
This code “traverses” each of the sub-meshes within the object. Again, each 3D model can be created differently, so this code goes over each mesh until all have been covered.
Once each sub-mesh is found, we check if the node is actually a mesh (and not some other data type by accident). If true, we:
- Remove its texture (this is an optional line, you can remove this if you want to keep the texture. Removing the texture only makes the colour stand out more).
- Change the colour of that mesh to ‘blue’. (Any other colour should be usable here).
Start populating your Scene with more 3D models. For the best results, try and find objects that are not high definition or contain contain large amounts of polygons/tris. This will slow both the application down and the loading process.
Next lesson we cover how to add in animated 3D models, and how to play and switch between which animation is being played.
A Beginner’s Guide to Creating a VR Experience


A Beginner’s Guide to Creating a VR Experience
Reach your personal and professional goals
Unlock access to hundreds of expert online courses and degrees from top universities and educators to gain accredited qualifications and professional CV-building certificates.
Join over 18 million learners to launch, switch or build upon your career, all at your own pace, across a wide range of topic areas.


