Skip main navigation

Data formats

Learn more about data formats

As mentioned previously, Bokeh can plot different formats of data by extracting the data out from Pandas DataFrames, dictionaries, or by using its very own ColumnDataSource class. In most cases, this comes in handy when you need to feed your data on a graph and also have a popup window showing data information.

Plotting directly from a DataFrame

Let us look at how to plot data directly from a DataFrame. Similar to Seaborn, Bokeh can be provided a DataFrame and the name of its data series (columns), and then extract the information (x- and y-coordinates, etc.) all by itself.

We’ll return to our Iris data set for these next few examples.

Let’s draw the scatter plot to which we’ve become accustomed to seeing: petal length versus width. Well use the Figure.scatter method for this. As well as taking raw x- and y-coordinates for points, we can pass the series names as the x- and y-values, and the data frame as the source keyword argument, and have the function extract the information itself.

Code:

iris_data = pd.read_csv("iris.csv")
p = figure(plot_width=400, plot_height=400)
p.scatter("petal.length", "petal.width", source=iris_data)

Output:

Screenshot from storyboard which shows multiple blue dots scattered on the plot in a diagonal fashion. On the top right of the chart there is an edit section where there is a 4-way arrow that is highlighted. X-axis from left to right reads: 1, 2, 3, 4, 5, 6, 7. Y-axis from bottom to top reads: 0, 0.5, 1, 1.5, 2, 2.5. Click to enlarge

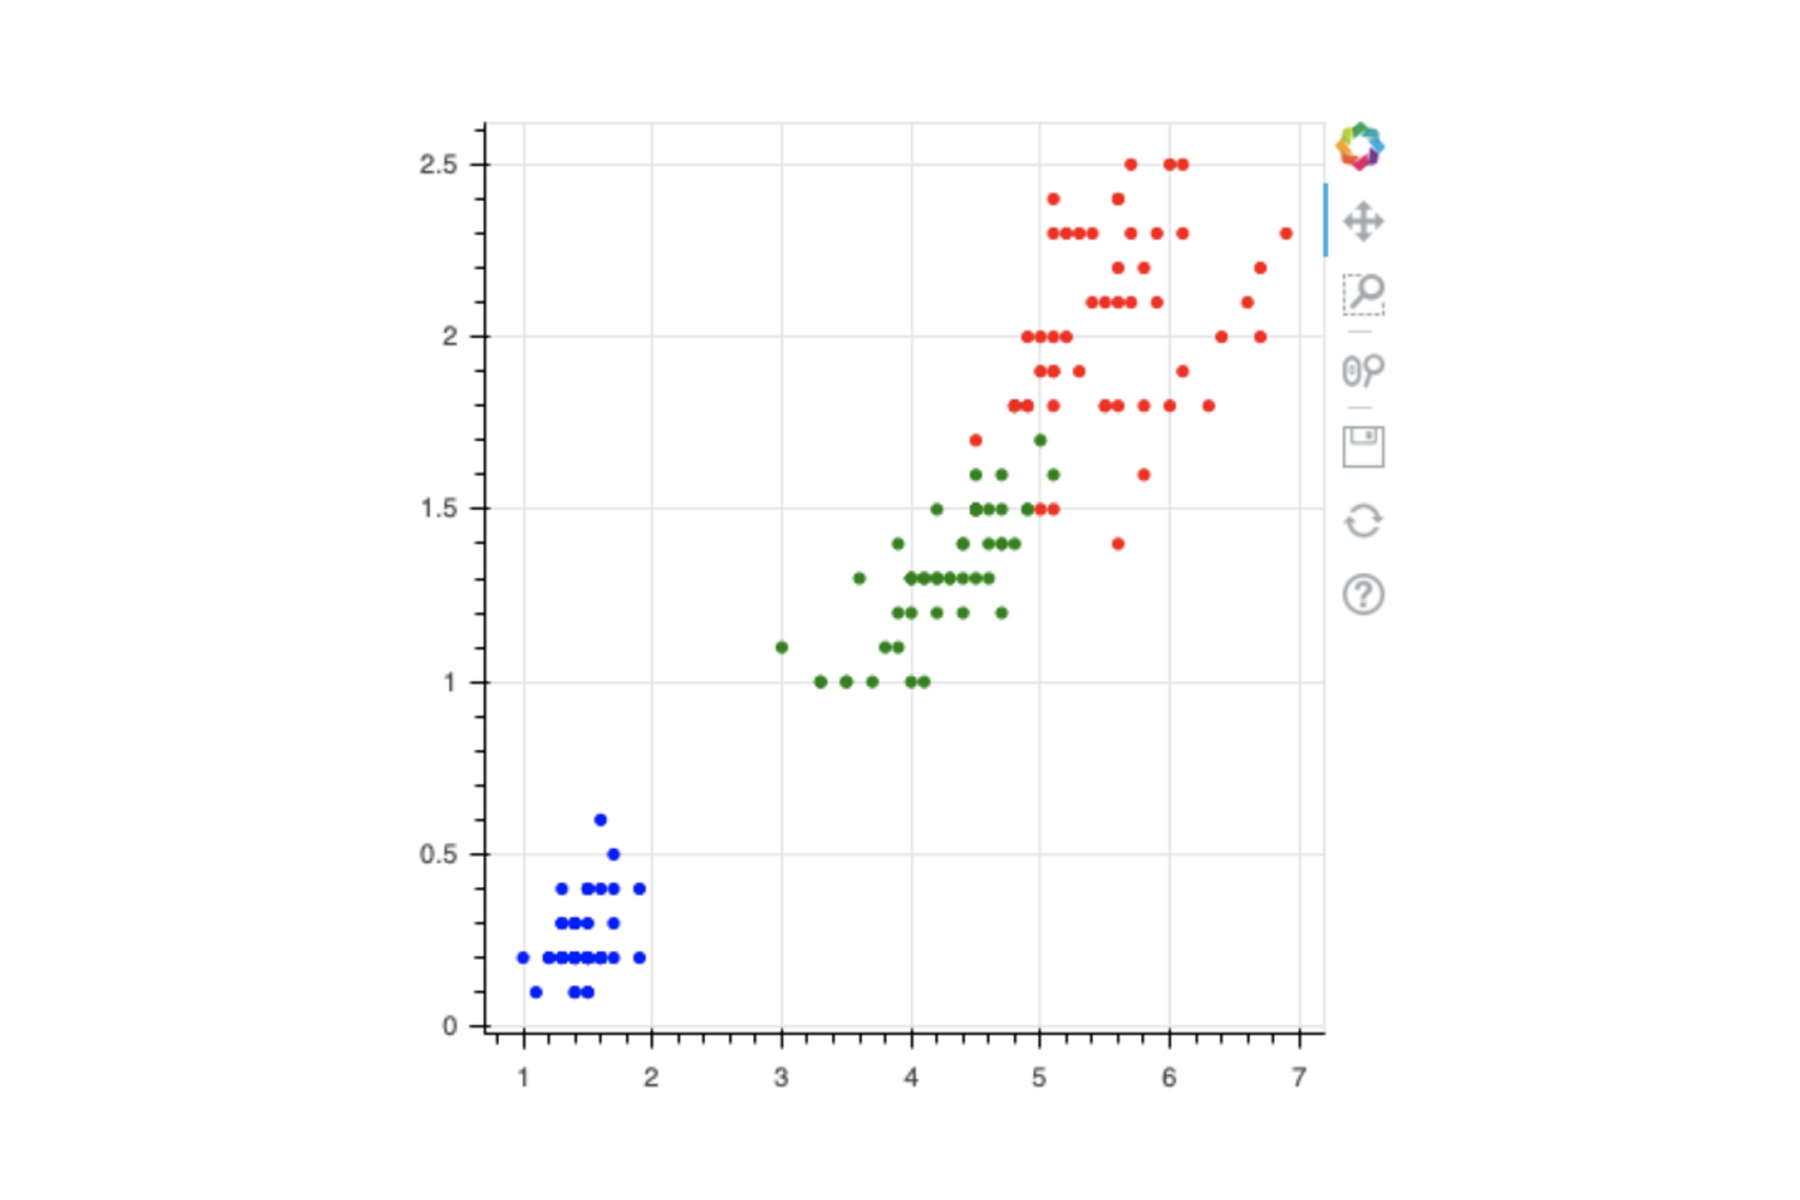
We can, of course, plot multiple scatter plots on the same Figure. For example, let’s split our Iris data by species and draw each as a separate colour:

Code:

versicolor = iris_data[iris_data.variety == "Versicolor"]
setosa = iris_data[iris_data.variety == "Setosa"]
virginica = iris_data[iris_data.variety == "Virginica"]

p = figure(plot_width=400, plot_height=400)
p.scatter(versicolor["petal.length"], versicolor["petal.width"], color="green")
p.scatter(setosa["petal.length"], setosa["petal.width"], color="blue")
p.scatter(virginica["petal.length"], virginica["petal.width"], color="red")

Output:

Screenshot from storyboard which shows multiple coloured dots scattered on the plot in a diagonal fashion. On the top right of the chart there is an edit section where there is a 4-way arrow that is highlighted. X-axis from left to right reads: 1, 2, 3, 4, 5, 6, 7. Y-axis from bottom to top reads: 0, 0.5, 1, 1.5, 2, 2.5.Click to enlarge

ColumnDataSource

ColumnDataSource is a bit like a ‘DataFrame-like’ class. Internally, Bokeh converts data passed to it into this format before being rendered. There’s some internal implementation inside the ColumnDataSource that makes it more efficient when data is appended or updated en-masse.

We won’t be making use of these features as we’ll be plotting from DataFrames, but if you’re interested in learning more, read about the feature in the documentation.

Read: ColumnDataSource [1]

Now that we’ve learned how to plot additional glyphs and also plot directly from DataFrames, we will next explore other ways of drawing similar plots in the next step.

What options for customisation are there?

So far, you have learned so far to draw glyphs and change their colour but there are more options to customise them.

Most glyph drawing methods take these arguments:

  • color: This affects the fill colour of the glyph(s). These can be named colours or hexadecimal colour codes.
  • alpha: This refers to the opacity of the glyphs (0 to 1).
  • line_color: This relates to the colour of the glyph border.
  • line_width: This relates to the width of the glyph border.

Follow the instructions below in your Notebook.

Step 1

Let us use these arguments to draw some squares.

Code:

p.square([0, 1, 2], [0, 1, 2], size=40, color="green", alpha=0.4, line_color="red", line_width=3)

Output:

Screenshot from Jupyter notebooks which shows markers as green squares with red outline. On the top right of the chart there is an edit section where there is a 4-way arrow that is highlighted. X-axis from left to right reads: 0, 0.5, 1, 1.5, 2. Y-axis from bottom to top reads: 0, 0.5, 1, 1.5, 2. There is a green square with red outline on the cross section of 0(y) and 0(x). There is another green square with red outline on the cross section of 1(y) and 1(x). There is another green square with red outline on the cross section of 2(y) and 2(x).Click to enlarge

Step 2

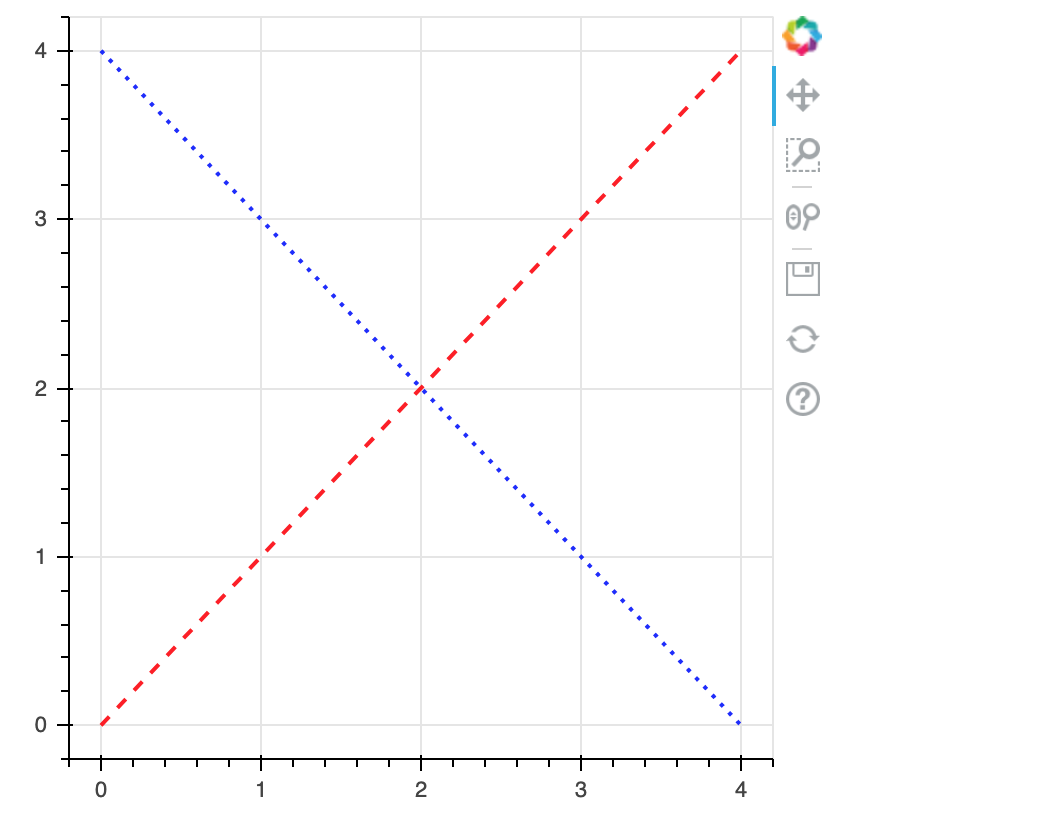
Another option we can specify is ‘line_dash’ – this is particularly useful when working with line plots. Valid options for line_dash are “solid”, “dashed”, “dotted”, “dotdash” or “dashdot”.

Here’s how it’s used:

Code:

p.line([0, 4], [0, 4], alpha=0.9, line_color="red", line_width=2, line_dash="dashed")
p.line([0, 4], [4, 0], alpha=0.9, line_color="blue", line_width=2, line_dash="dotted")

Output:

Screenshot from Jupyter Notebook that shows a dotter red line and dotted blue line crossing each other on the plot. X-axis from left to right reads: 0, 1, 2, 3, 4. Y-axis from bottom to top reads: 0, 1, 2, 3, 4. The dotted red diagonal line starts from 0(y),0(x) and ends at 4(y), 4(x). The dotted blue diagonal line starts from 4(y), 0(x) and ends at 0(y), 4(x). The two dotted lines intersect at 2(y), 2(x). On the top right of the chart there is an edit section where there is a 4-way arrow that is highlighted.Click to enlarge

We saw earlier that Bokeh can fetch information from DataFrames to set the coordinates of points. It can also use other information that you specify to change the marker colour and styles, and even draw legends automatically.

References

  1. Providing Data [Document]. Bokeh; [date unknown]. Available from: https://docs.bokeh.org/en/latest/docs/user_guide/data.html
This article is from the free online

Data Visualisation with Python: Bokeh and Advanced Layouts

Created by
FutureLearn - Learning For Life

Reach your personal and professional goals

Unlock access to hundreds of expert online courses and degrees from top universities and educators to gain accredited qualifications and professional CV-building certificates.

Join over 18 million learners to launch, switch or build upon your career, all at your own pace, across a wide range of topic areas.

Start Learning now