Skip main navigation

The key elements of a simple VR Experience

In this article, we provide our design process that led to the simple VR experience of 'Whack-A-Mole'. Let's explore.

Let’s conceptualize a VR experience based on the popular ‘Whack-A-Mole’ game.

The VR ‘Wack-A-Mole’ game

We start with the setting of the experience. Many people are familiar with “Whack-a-mole” as a fun activity. The scene consists of a field or area with holes in it. The creatures ‘moles’ appear at random intervals from these holes and go back down after a short time.

The goal of the activity is to hit or ‘whack’ the mole with a mallet to quash it. The activity has variations for continuation, but the core experience is to ‘whack’ the ‘mole’ quickly once it appears out of a hole.

The Whack-A-Mole Storyboard

To convert this setting to a VR web app, we start to storyboard what we need to do.

A side-note on storyboarding

Remember that storyboard panels are supposed to be rough, messy and focused on details rather than how well they are drawn. Always spend more time on the idea rather than drawing it right.

Our storyboards were drawn to focus your attention on what to think about and hence drawn with a little more effort than we would actually spend on a real storyboard.

The First Panel: Setting

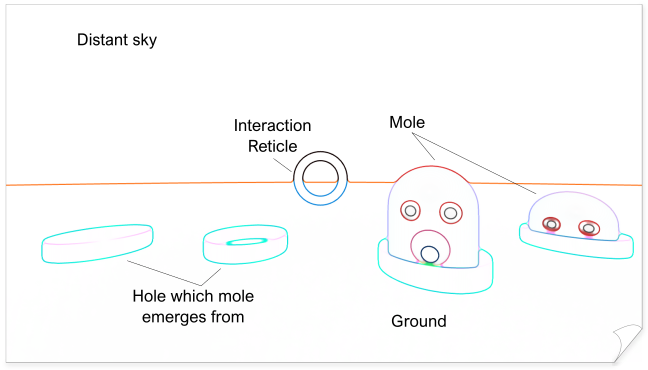
Let’s draw the basic concept for the setting for our VR experience. We know that the activity involves a ground area, holes and moles.

Since this is a VR experience, we need a representation for a hammer. Figure 1 sets the context of the setting. We notice empty space beyond the ground area and decide to simply fill it with the distant sky.

First Storyboard Panel of Whack-A-Mole showing mole, hole, reticle, ground and sky Figure 1. First Storyboard Panel of Whack-A-Mole: Set the context

The Second Panel: Attributes

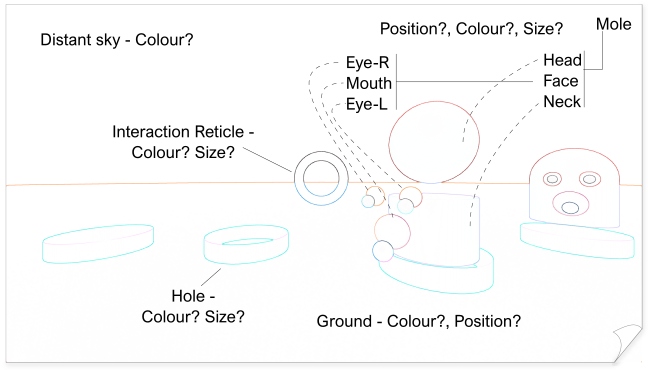
Once we have established the context, we now have a general picture of what objects will go into the virtual world. Like objects in the real world, these objects have attributes.

In our case, we are concerned with the visual attributes of these objects. How do we represent a hole or even a mole? The mole is more complex and requires “assembly” using more shapes.

Similarly, we need to think about the individual attributes of shape, size, position and colour of all the objects we have identified so far.

We also need to decide where the user is located. This location should offer the best view of the virtual world. We sketch out these details in Figure 2.

Second Storyboard Panel of Whack-A-Mole showing spatial and colour attributes of the entities Figure 2. Second Storyboard Panel of Whack-A-Mole: Spatial and colour attributes

The Third Panel: Motion

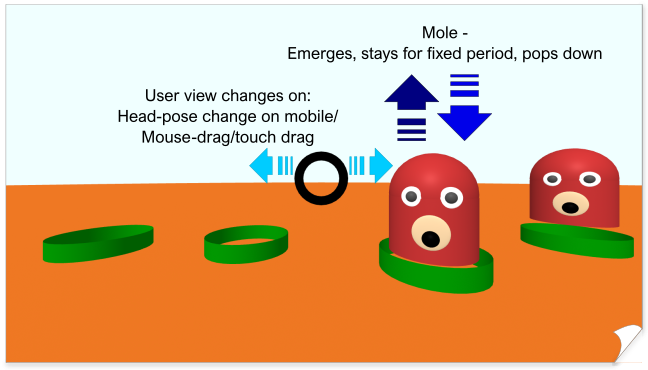
The first panel sets the context of the Whack-A-Mole activity, but it doesn’t capture the movement that occurs during the activity. The third panel captures this motion.

As a designer of the virtual world, if you don’t specify (and program) the motion, no motion will occur in the world. Thus it is absolutely important to capture details that are contextually obvious to someone familiar with the setting but may not be apparent to someone (and this may just be the programmer in your team) who is not familiar with the setting.

We capture these details in Figure 3.

Third Storyboard Panel of Whack-A-Mole showing motion attributes of the entities Figure 3. Third Storyboard Panel of Whack-A-Mole: Motion

The Fourth Panel: Interaction

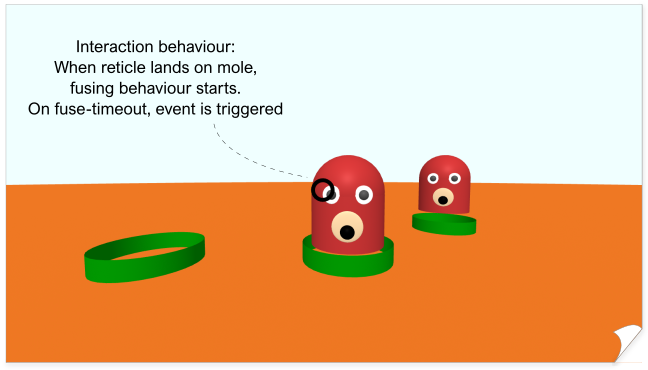
We have enough detail about the virtual world to start thinking about how the user will interact with the world. This is also the first point where we make a design decision based on an estimate of what the user has to access.

We could assume that the user has a full VR headset with tracked 6DoF controllers. However, it is more likely that the user is going to access this experience on a smartphone or even a laptop. Based on this, we settle on a reticle-based fuse-cursor interaction technique as shown in Figure 4.

In your work, you may have prior specifications on what the user will be using. In case you don’t, remember to make your virtual world accessible in as many ways as possible.

Fourth Storyboard Panel of Whack-A-Mole showing interaction when reticle lands on mole Figure 4. Fourth Storyboard Panel of Whack-A-Mole: Interaction

The Fifth Panel: VR experience

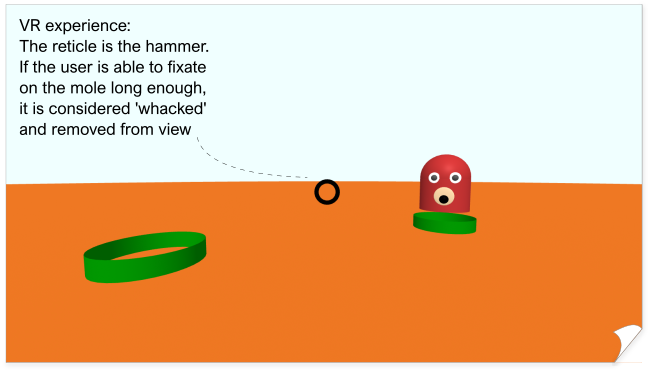
With the virtual objects defined and the interaction techniques identified, it is now time to sketch how the activity will be completed as a part of the VR experience.

We need to translate the action of using a hammer to quash the mole into virtual action. We also use this as the opportunity to specify what happens when the mole is quashed. These details are captured in Figure 5.

Fifth Storyboard Panel of Whack-A-Mole showing VR experience of mole being removed Figure 5. Fifth Storyboard Panel of Whack-A-Mole: VR experience

Finishing up

Storyboarding is the initial phase of the development process of the VR experience. We capture enough detail to create basic mock-ups of the experience and put down some starting code.

Once we get these off the ground, we need to add further logic which expands the experience for the user. Further logic needs to be added to achieve the goals of the VR experience.

For example, here we have:
1. The initial distribution of the holes is randomly generated each time the VR web app is loaded.
2. Once all the initially generated moles have been quashed, a ‘golden’ mole appears.
3. Once the golden mole is quashed, the VR web app resets back to start.

Our design process 

This is a quick walkthrough of our design process. When you work on your VR experience, the panels may be different. For complex experiences, you may have to break it down into multiple activities and each activity is then addressed through its own set of panels.

Interaction sequences can be more complex and thus require more panels. It’s now your turn to try your hand at thinking about creating your own VR experience.

If you’d like to learn more about constructing a VR experience, check out the full online course, from Lancaster University, below.

This article is from the free online

Construct a Virtual Reality Experience

Created by
FutureLearn - Learning For Life

Reach your personal and professional goals

Unlock access to hundreds of expert online courses and degrees from top universities and educators to gain accredited qualifications and professional CV-building certificates.

Join over 18 million learners to launch, switch or build upon your career, all at your own pace, across a wide range of topic areas.

Start Learning now