Skip main navigation

New offer! Get 30% off one whole year of Unlimited learning. Subscribe for just £249.99 £174.99. New subscribers only. T&Cs apply

Find out more

SLAs and Custom KPIs

.

In the previous step, you learnt about setting goals to meet future requirements. These goals will assist you in setting up SLA’s and KPI’s.

Service Level Agreements (SLAs) are the level of service or support your company offers to a customer.

The SLAs will include detailed items that help define metrics or key performance indicators (KPIs) to ensure service levels defined by your company are being met. For example, if you want to measure if salespeople are contacting leads within a week of the lead record being created, the success rate of each salesperson can be measured by using SLAs.

Historically, SLAs were only available in the case entity. These SLAs measure if customer service agents were obtaining their goals on contacting and helping customers in a timely manner. Now, SLAs for several other entities are available.

Enabling Service Level Agreements

The entities in Dynamics 365 for Sales that can now have SLAs are Accounts, Contact, Order, Invoice, Quote, Opportunity, Lead, and all activities (except recurring appointments) but only seven can be active at one time. Errors will occur if you try to enable this for an 8th entity.

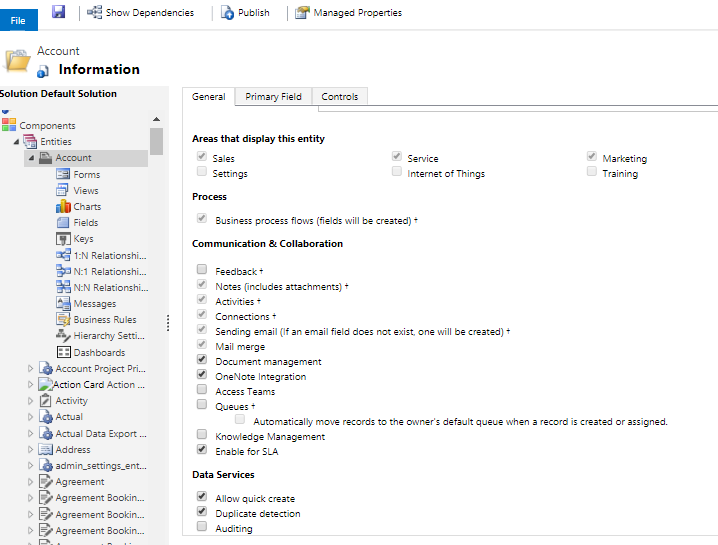
Case is the only entity that the enable for SLA option is enabled by default. The others need to be manually enabled. They can be enabled in the entity definition. Once enabled in the entity, you will need to publish the solution.

Screenshot of enabling of entities for the creation of an SLA

When the enable for SLA for an entity is enabled, the SLA (SLAID) and the Last SLA applied (SLAInvokedID) fields will be created in that entity. Both are lookup fields to the account record type.

Note: Once an entity is enabled for SLAs, you cannot disable it. Plan carefully as once you choose seven entities for SLAs, no more entities can be enabled.

Create Custom Fields for SLA KPIs

Each entity that is enabled for SLAs will need their own SLA timers (fields). Just like any custom fields, once these fields are created, they will need to be added to forms and published in order for the field to be ready for use.

This field needs to be a lookup field and for the record type, select the SLA KPI Instance.

Creating Service Level Agreements

SLAs need to be created to ensure that Key Performance Indicators (KPIs) are being tracked. Tracking SLAs statuses and times for different entity forms are tracked through the SLA KPI instance record type.

Note: The maximum number of SLA KPIs per entity for one organisation is five for Dynamics 365 Customer Engagement online for all entities except the incident (case) entity. No such limits apply Dynamics 365 on-premises and the incident entity.

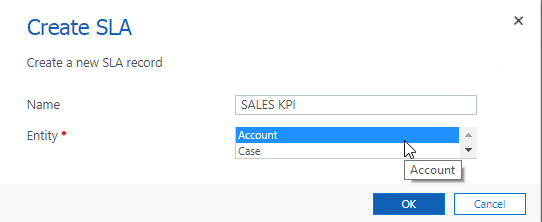
To create the SLAs, create them under Service Management and Service Level Agreements. The system will ask you to give the SLA a name and select the entity to measure a time or status change.

Note: Only the entities that were enabled for SLAs will appear in this drop-down menu.

Screenshot showing how to create a new SLA

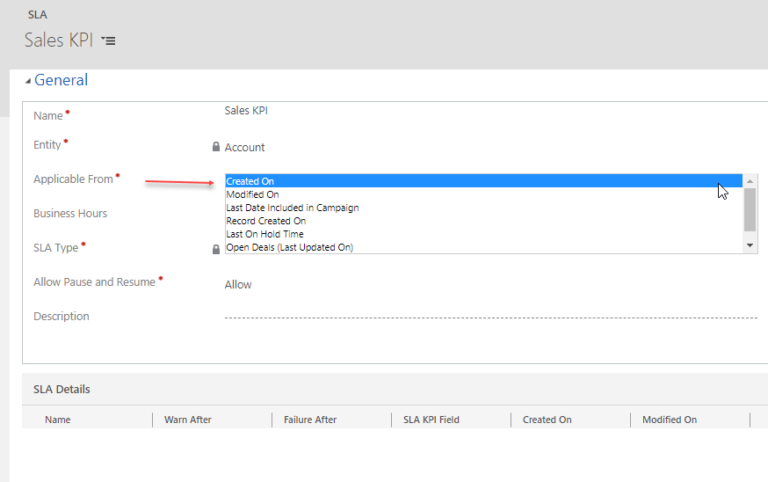
Select which field to track to meet the standard of the company. For example, if Created On is selected, the calculation will start from the time the record was created.

Screenshot of how to set when a KPI is applicable from

The SLA must be saved before details can be added for what measurements to include.

Note: You may still see occasional references to Enhanced SLA type. That is the only available option moving ahead as non-enhanced SLAs have been selected for deprecation.
Select an SLA KPI from the drop-down list. These must be created beforehand in each entity as mentioned earlier in this document.
Add the conditions needed and what information meets the success criteria.

Adding Timers

Timer controls are visual representations that show the remaining time or time elapsed based on the date or time field specified in the Failure Time field of the SLA KPI instance. The control shows current state and will either show Succeeded, Expired, Paused, Cancelled or Not Set depending on if the SLA conditions are met or not.
Note: Timers will not keep track of the time for the Pause condition if applicable.

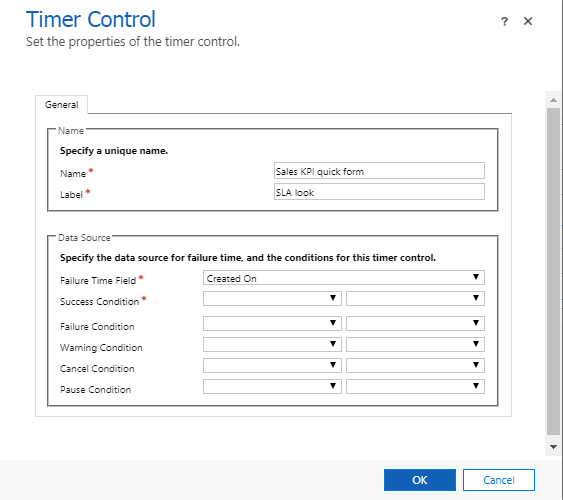
You can create quick forms in the entity that you created the SLA KPI fields. In customisation of the entity, you would create a quick form and add a timer. Fill out the appropriate fields that match the SLAs created.

Screenshot showing how to create a timer control for a KPI

If you want the timers to show in the original forms, you would then add the quick form to a new section and insert the quick form created above. This would place the timer information for the current record every time you opened the main form.

We have now completed sales analytics and insights. In the next activity, we will learn about Power BI and AI for sales.

This article is from the free online

Dynamics 365: Customer Engagement for Sales

Created by
FutureLearn - Learning For Life

Reach your personal and professional goals

Unlock access to hundreds of expert online courses and degrees from top universities and educators to gain accredited qualifications and professional CV-building certificates.

Join over 18 million learners to launch, switch or build upon your career, all at your own pace, across a wide range of topic areas.

Start Learning now