
What is Querying a Database?
Querying a database involves requesting to access data from a database to retrieve it or manipulate it. The SELECT statement is the most commonly used SQL statement for querying data in a database. SELECT has a large number of optional clauses, each with its own set of options and formats. The most general format of a SELECT statement in SQL looks like this:
SELECT [DISTINCT] select_heading
 FROM source_tables
 WHERE filter_expression
 GROUP BY grouping_expressions
 HAVING filter_expression
 ORDER BY ordering_expressions
 LIMIT count
 OFFSET count
Every SELECT command has a SELECT heading, which defines the returned value. Each additional clause (FROM, WHERE etc.) is technically optional, although in reality it’s unlikely you’d try to select information without specifying a table using the FROM clause.
Conceptually, the result of a SELECT statement is calculated by generating a ‘working table’, and then passing that table through the pipeline. Each step takes the working table as input, performs a specific operation or manipulation and passes the modified table on to the next step.
No matter how large or complex a SELECT statement may be, they all follow this basic form. If you can’t understand how a query works, break it down and look at each individual clause to see what the working table looks like at that point, and how the clause will modify and manipulate the table before it moves to the next clause.
Database Query Demo
In this exercise we will use the Chinook database. This is a sample database that’s often used for teaching or testing and is available for a number of SQL databases and database tools.
The Chinook database is a digital media store that includes tables for artists, albums, media tracks, invoices and customers.
To find some background information and context for the Chinook database, go to this webpage: Chinook database [1]
The diagram below details the Chinook tables and their attributes.
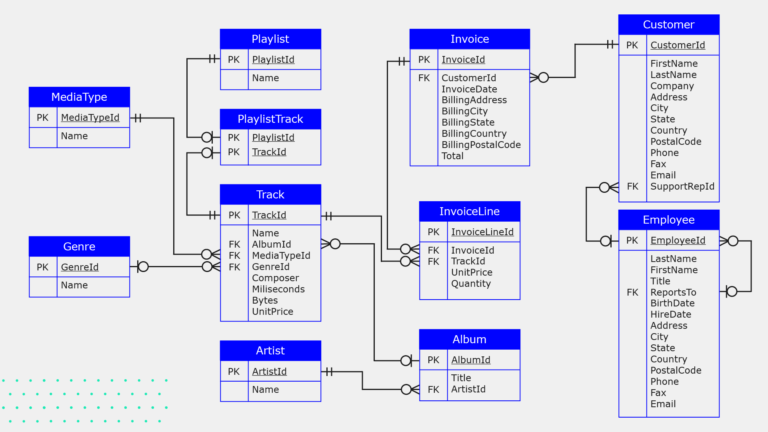
We’ll use the Chinook database for our examples and activities. You can download a copy of the database in SQLite3 format using the link below. A PDF copy of the schema is attached at the end of the page.
You can follow and run the commands in SQLite, using this database, as we work through the clauses of the SELECT statement.
-
- Download: Chinook_Sqlite.sqlite (SQLite DB)
SELECT Header and FROM Clause
Let’s start by retrieving some information from a table.
To do this we’ll need to use the SELECT header with the FROM clause. The SELECT header specifies information to be returned and the FROM clause specifies the tables to look in.
If we want to find the first names of all our customers, we can look up the appropriate table names and attribute names in our schema – in this case, the FirstName attribute of the Customer table. In the SELECT header we can specify that we want to return the FirstName column, and in the FROM clause, we indicate that we want to get this data from the Customer table.
This is written as:
SELECT FirstName
FROM Customer;
To retrieve both the first and last names of customers, we can specify multiple columns in the SELECT header. Each column is separated by a comma.
For example:
SELECT FirstName, LastName
FROM Customer;
But what if you want to look at the entire table? We could type the name of each column, but that’s time consuming and it’s easy to make mistakes. Fortunately there’s a shortcut – you can use a wildcard. An asterix (*) results in every user-defined column being returned from the source table.
For example this syntax:
SELECT *
FROM Customer;
Would return:
CustomerId FirstName LastName Company Address City State Country PostalCode Phone Fax Email SupportRepId
---------- ---------- ---------- ------------------------------------------------ ------------------------------- ------------------- ---------- ---------- ---------- ------------------ ------------------ -------------------- ------------
1 Luís Gonçalves Embraer - Empresa Brasileira de Aeronáutica S.A. Av. Brigadeiro Faria Lima, 2170 São José dos Campos SP Brazil 12227-000 +55 (12) 3923-5555 +55 (12) 3923-5566 luisg@embraer.com.br 3
2 Leonie Köhler Theodor-Heuss-Straße 34 Stuttgart Germany 70174 +49 0711 2842222 leonekohler@surfeu.d 5
...
59 Puja Srivastava 3,Raj Bhavan Road Bangalore India 560001 +91 080 22289999 puja_srivastava@yaho 3
(Note that we’ve truncated the output because there are 59 records.)
Selecting DISTINCT Records
If you want to query distinct (unique) values from a particular column, or columns, you can use the SELECT DISTINCT statement.
To find out which countries our customers are from, we could use:
SELECT DISTINCT Country
FROM Customer;
This would return:
Country
-------------------
Brazil
Germany
Canada
Norway
Czech Republic
Austria
Belgium
Denmark
USA
Portugal
France
Finland
Hungary
Ireland
Italy
Netherlands
Poland
Spain
Sweden
United Kingdom
Australia
Argentina
Chile
India
You can see that each country is displayed only once when using the DISTINCT clause.
LIMITing Results
The final clauses to cover in this step are LIMIT and OFFSET.
At present our Customer table has only a few records, but what if there were 500, or 5000, or 5,000,000? Running queries on large volumes of data can help you uncover valuable insights but can be a computationally intensive process and, in some cases, queries can be very slow!
LIMIT and OFFSET Clauses
When you’re exploring a database or preparing and testing your queries, it’s a good idea to limit the number of rows being returned in your queries. This speeds up your testing and reduces the work done by the computer. To do this, you can use the LIMIT and OFFSET clauses to extract a subset of rows from the final results table.
LIMIT defines the maximum number of rows that will be returned, while OFFSET defines the number of rows to skip before returning the first row.
The queries below show LIMIT and OFFSET in action. The first example returns the first 2 rows, and the second returns three rows, starting from the 10th row:
SELECT *
FROM Customer
LIMIT 2;

SELECT *
FROM Customer
LIMIT 3 OFFSET 10;
Try it out
If you haven’t already done so, download and open the Chinook database in SQLite.
Run some of the queries in this step to check that you’ve set it up correctly and that your output matches the examples.
When everything’s up and running, try to write queries to find out:
- which country the music store’s employees are located in
- the pricing options for individual music tracks.
References
1. Lerocha. Chinook-database [Internet]. Available from: https://github.com/lerocha/chinook-database


Reach your personal and professional goals
Unlock access to hundreds of expert online courses and degrees from top universities and educators to gain accredited qualifications and professional CV-building certificates.
Join over 18 million learners to launch, switch or build upon your career, all at your own pace, across a wide range of topic areas.


