Skip main navigation

New offer! Get 30% off one whole year of Unlimited learning. Subscribe for just £249.99 £174.99. New subscribers only. T&Cs apply

Find out more

Azure Resource Manager Templates and Visual Studio

.

In the previous step, you learned about Azure Resource Manager, how to create an Azure Resource Manager template, and how to use Visual Studio code.

In this step, we’ll explore the integration between Visual Studio and Azure Resource Manager. We’ll focus on creating a resource group project and templates from within Visual Studio.

Creating an Azure Resource Group Project with Visual Studio:

Visual Studio (2013 and newer) and the Azure SDK (2.6 and newer) allows you to edit Azure Resource Manager JSON templates, which define the resources you deploy to Azure. Visual Studio provides many different starter templates for deploying common scenarios.

To deploy code with your infrastructure:

  1. Create an Azure Resource Group project in Visual Studio by choosing File > New Project, and then C# or Visual Basic.

  2. Select Cloud and the Azure Resource Group project. There are many different template options to choose from based on the type of project that you want to deploy:

RESOURCE GROUP PROJECT 01

  1. Customise the template to fulfil your scenario.

  2. Deploy your project from Visual Studio by choosing Deploy > New Deployment from the shortcut menu of the deployment project node:

RESOURCE GROUP PROJECT 02

  1. From the Resource group drop-down box of the Deploy to Resource Group dialogue box, choose an existing group or create a new one:

RESOURCE GROUP PROJECT 03

  1. Select the Edit Parameters button and provide values for the empty parameters and save.

  2. Select the Deploy button.

When you open the Azure portal and sign in to your account, you should see all the deployed resources after selecting Resource groups and the resource group to which you deployed. The Storage account name may add a string of characters to the name you provided to ensure a unique name.

Azure Resource Group Deployment Task

A recommended Azure deployment option from Visual Studio is to create or update a resource group with the Azure Resource Manager templates by using the Azure Resource Group Deployment Task in a continuous deployment pipeline.

To configure continuous deployment by using the built-in tasks:

  1. Edit your Visual Studio build definition to add two new build steps.
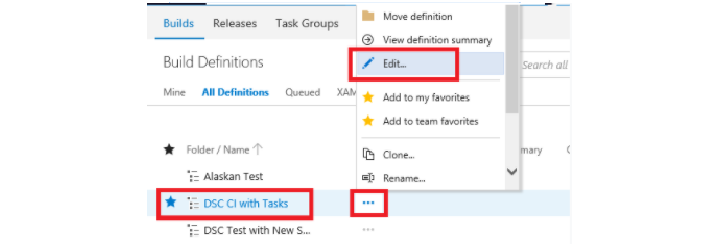
  2. Choose the build definition under the Build definitions category.
  3. Choose the Edit link:

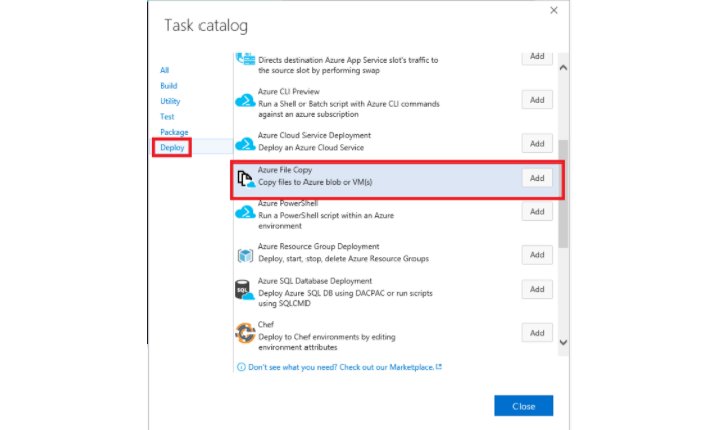
AR DEPLOYMENT TASK 01 4. Add the new build steps to the build definition by selecting the Add build step button. 5. Choose Deploy > Azure File Copy task > Add:

AR DEPLOYMENT TASK 02 6. Select the Azure Resource Group Deployment task > Add. 7. Select Close the Task Catalog:

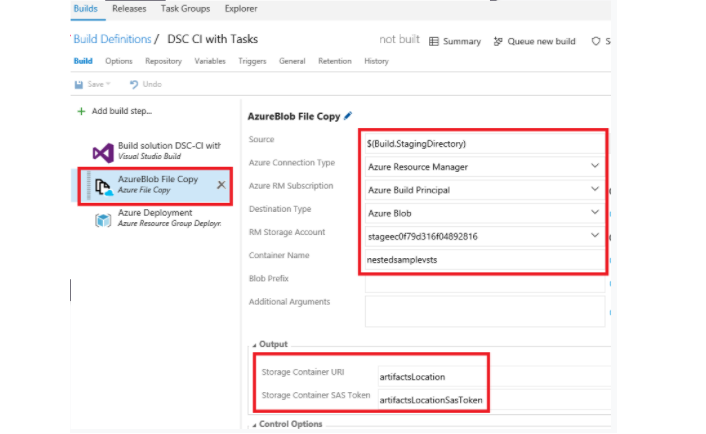
AR DEPLOYMENT TASK 03 8. Choose the Azure Resource Group Deployment build step and fill in the values:

AR DEPLOYMENT TASK 04 9. Override Template Parameter code:


-_artifactsLocation $(artifactsLocation) -_artifactsLocationSasToken (ConvertTo-SecureString -String "$(artifactsLocationSasToken)" -AsPlainText -Force)

10. Save the build definition and choose Queue new build.

Deploying Infrastructure Code to Azure with Visual Studio

To deploy code with your infrastructure:

  1. Add a new project to your Visual Studio solution. For example, ASP.Net Web Application:

IC TO AZURE 01 GRAPHIC

  1. Select MVC and unselect the Host in the cloud check box because the resource group project will take care of this task.

  2. Make sure that your resource group project is aware of the new project by going back to your resource group project and right-clicking References, select Add Reference and then select the project you created:

IC TO AZURE 02 GRAPHIC IC TO AZURE 03 GRAPHIC

  1. View the three key properties that were automatically set when you linked the project you created to the resource group project in the Properties window:

IC TO AZURE 04 GRAPHIC

  1. Add a resource to the template, for example, Web Deploy for Web Apps:

IC TO AZURE 05 GRAPHIC

  1. Redeploy your resource group project and set new parameters.
  2. Verify by selecting your web app in the Azure portal and select the URL to verify the app deployed to the site.
This article is from the free online

Microsoft Future Ready: DevOps Development, Implementation and Azure Automation

Created by
FutureLearn - Learning For Life

Reach your personal and professional goals

Unlock access to hundreds of expert online courses and degrees from top universities and educators to gain accredited qualifications and professional CV-building certificates.

Join over 18 million learners to launch, switch or build upon your career, all at your own pace, across a wide range of topic areas.

Start Learning now